


“We need an admin panel that’s only accessible to administrators, not regular users.”
“I’d like a dashboard where I can track certain key metrics.”
“It would be great to have a web page where, as an admin, I can upload articles or manage users.”
If you’ve ever worked on an e-commerce platform, a CRM, or similar projects, chances are you’ve heard requests like these. Usually, they’re followed by something like: “It doesn’t have to be too complex—after all, regular users won’t see it.
Issues with Traditional Approaches
To build our application, we could choose a tool like Angular or React. Alternatively, if we’re working with a backend framework such as Django or Symfony, we might opt for a template engine combined with some simple JavaScript.
However, both of these approaches have their drawbacks:
- Using tools like Angular or React requires additional knowledge, more time to start up, introduces extra dependencies that need to be maintained and updated, and ultimately adds unnecessary complexity to the project
- Relying on HTML with a template engine and vanilla JavaScript is simpler in theory, but no one enjoys dealing with long stretches of JavaScript just to handle basic interactions that most libraries can take care of effortlessly nowadays.
- And what if our frontend team is overloaded, and this task needs to be handled by someone who’s not comfortable with those technologies?
That’s where HTMX might be exactly what we need!
What's HTMX
From the documentation we can read that
"htmx is a library that allows you to access modern browser features directly from HTML, rather than using javascript."
HTMX's tag-like attributes simplify interaction with the backend while keeping the logic in the HTML layer. This makes development more intuitive and reduces JavaScript complexity in many scenarios.
When applied to our use case, HTMX offers several advantages:
- Since we only need to write HTML, our code is cleaner, more understandable, and easier to maintain.
- The absence of JavaScript and related libraries makes it more accessible for backend developers, and reduces ongoing maintenance requirements.
- Development is faster, as HTMX takes care of most of the necessary logic for us.

The Simplicity of HTMX
HTMX provides us with several useful tools for making AJAX calls, replacing parts of HTML with the received responses, triggering requests on certain events, and much more.
HTMX makes simplicity its greatest strength for several reasons:
- It is so easy to integrate into your projects.
- It doesn't come with heavy dependencies, doesn’t require TypeScript, nor does it rely on ES6. This makes it perfect for browser-based applications and even compatible with Internet Explorer 11.
- Its lack of dependencies and the straightforward way HTMX’s code is designed make it ideal for the open-source world, encouraging user contributions and collaboration.
How to start an HTMX project
HTMX is a dependency-free, browser-oriented javascript library. To use it we can simply add a <script> tag to our document head and we are ready to go.
We can include HTMX via CDN:
    <head>
    <metacharset="UTF-8">
    <title>Modern MVC with HTMX</title>
    <script src="https://unpkg.com/htmx.org@2.0.4" integrity="sha384-HGfztofotfshcF7+8n44JQL2oJmowVChPTg48S+jvZoztPfvwD79OC/LTtG6dMp+" crossorigin="anonymous">
    </script>
    </head>
Or we can download from here and include the file in our HTML:
    <head>
    <meta charset="UTF-8">
    <title>Modern MVC with HTMX</title>
    <script src="/path/to/htmx.min.js"></script>
    </head>
We can also install it in our application as an external dependency using our favorite package manager. This could be useful in case we want to extend a React application with HTMX.
Installing it:
npm install htmx.org@2.0.4
And add import in our javascript/typescript file.
import 'htmx.org';
In this article we will use it via CDN.
AJAX Requests
HTMX provides a range of attributes to handle HTTP requests directly in HTML, with each one serving a specific purpose.
hx-get
Can be used to send HTTP GET requests. It is typically employed to retrieve data from the server for display or interaction without requiring form submissions. When combined with hx-params, you can specify query parameters to dynamically modify the request.
For example:
<button hx-get="/api/data" hx-params="key=value">Fetch Data</button>
This sends a GET request to /api/data with the parameter key=value.
hx-post,hx-put and hx-patch
These attributes send HTTP POST/PUT/PATCH requests, commonly used to submit data to the server, such as form inputs or payloads. This is ideal for operations that create or update resources. For example:
    <form hx-post="/api/save">
    <input type="text" name="username" />
    <button type="submit">Submit</button>
    </form>
The above sends the form data to /api/save using a POST request but it can easily be changed with hx-put or hx-patch, depending on type of request we want to send.
hx-delete
Can be used to send HTTP DELETE requests, intended for removing a resource from the server. Simple and effective, it works as shown below:
<button hx-delete="/api/delete" hx-params="id=456">Delete Resource</button>
This sends a DELETE request to remove the resource identified by id=456.
Triggering Requests
It’s possible to trigger requests with different events using the hx-trigger attribute. By setting specific values for this attribute, you can control when a request is fired. Below are some examples of commonly used values for hx-trigger:
input
Fires the request on every keystroke, perfect for real-time updates (such as live search results).
<input type="text" hx-get="/search" hx-trigger="input" />
change
Fires the request only when the element loses focus or when its value changes (great for dropdowns or form fields).
        <select hx-get="/api/filter" hx-trigger="change">
        <option value="all">All</option>
        <option value="active">Active</option>
        <option value="completed">Completed</option>
        </select>
load
automatically once the element is initially loaded onto the page. This is useful for dynamic content loading or initializing parts of a webpage.
<div hx-get="/api/data" hx-trigger="load"></div>
delay
This value lets you delay the request by a specified amount of time after the triggering event. If another event of the same type occurs during the delay period, the countdown resets, ensuring only one request is sent after the delay. Could be useful in live search combined with other type of trigger.
<input type="text" hx-get="/search" hx-trigger="input delay:500ms" />
To check all the possible use case of triggers you can check the docs
Handle Response
HTMX provides attributes such as hx-target and hx-swap to control how and where a server’s response is applied to the DOM. These attributes give you precise control over your page's dynamic behavior without requiring JavaScript.
hx-swap
This attribute lets you define how the response content from the server is swapped into the target element (or the element that made the request). The default behavior is to replace the inner content of the targeted element using innerHTML.
<button hx-get="/api/message" hx-swap="innerHTML">Get Message</button>
outerHTML replaces the entire target element (including the tag itself) with the response.
<div hx-get="/api/card" hx-swap="outerHTML">Fetch Card</div>
To check every possible values read the docs
hx-target
This attribute allows you to specify which element in the DOM will be swapped with the server's response, rather than swapping the element that triggered the request.
    <button hx-get="/api/message" hx-target="#output">Get Message</button>
    <div id="output"></div>
The server's response replaces the content of the <div> with id="output" (using the default innerHTML swap behavior).
Practical Use Cases of HTMX
Many dashboards share common features, such as pagination, real-time data polling to update charts, form validation for adding new users or other entities, bulk file uploads, and table search functionality. HTMX simplifies the implementation of all these tasks—and much more—making development faster and more streamlined.
In this article, I’ll guide you through several practical examples to showcase HTMX's capabilities. However, I strongly recommend exploring the official documentation for a comprehensive overview of its features and use cases.
The examples presented here are built using HTMX, Tailwind CSS, and Twig (the template engine used by the Symfony framework). That said, these examples can be easily adapted to work with any backend language or template engine.
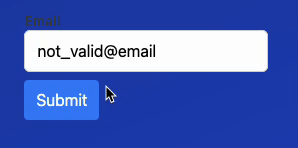
Form Validation
HTMX can be used to implement real-time form validation by sending data to the server to check its validity and dynamically displaying error messages or confirmations. For this, you can use attributes like hx-post, hx-trigger, hx-target, and hx-swap.

Controller:
    #[Route('/validate-email', name: 'validate_email', methods: ['POST'])]
    public function validateEmail(Request $request): Response
    {
    $email = $request->request->get('email');

    // Mock validation logic (replace with your validation logic)
    $isValid = filter_var($email, FILTER_VALIDATE_EMAIL) !== false;

    // Return a user-friendly message formatted for display
    if ($isValid) {
        return new Response('<span class="text-sm text-green-600">Email is valid!</span>');
    }
    return new Response('<span class="text-sm text-red-600">Please enter a valid email address.</span>');
    }
FormHTML
    <form hx-post="/validate-email" hx-target="#email-validation-result" hx-swap="outerHTML">
    <label for="email" class="block text-sm font-medium text-gray-700">Email</label>
    <input
    type="email"
    name="email"
    id="email"
    class="border border-gray-300 px-3 py-2 rounded-md"
    hx-trigger="change delay:500ms"
    />
    <div id="email-validation-result" class="text-sm mt-2"></div>
    <button type="submit" class="bg-blue-500 text-white px-3 py-2 rounded hover:bg-blue-700">Submit</button>
    </form>
Active Searching
To implement active searching we need to use hx-getto send get request, hx-params to add query params to our request, hx-target to point to our table that need to be populated with filtered result and hx-trigger to define when and how the get request should be sent.

Controller:
    #[Route('/users_search', name: 'users_search', methods: ['GET'])]
    public function search(
    #[MapQueryParameter] string $search,
    Request $request
    ): Response
    {
    //return html file to frontend if is the first load
    if (!$request->headers->get('HX-Request')) {
    return $this->render('users/search_user.html');
    }

    //how to filter result depends on your system
    $users = $this->userService->filter($search);

    //return table rows with filtered data
    return $this->buildResponse($users);
    }
Building response:
    private function buildResponse($users): Response
    {
    $html = '';
    foreach ($users as $user) {
        $html .=
        '<tr>
         <td class="px-6 py-4 whitespace-nowrap">
         <div class="text-sm text-blue-900">'.$user['id'] .'</div>
         </td>
         <td class="px-6 py-4 whitespace-nowrap">
         <div class="text-sm text-blue-900">'.$user['name'].'</div>
         </td>
         <td class="px-6 py-4 whitespace-nowrap">
         <div class="text-sm text-blue-900">'$user['last_name'].'</div>
         </td>
         </tr>';
    }
    return new Response($html);
    }
search_user.html:
    <!--....other html....-->
    <input
    class="form-control border border-gray-300 rounded-md px-3 py-2 mb-4"
    type="search"
    name="search" placeholder="Begin Typing To Search Users..."
    hx-get="/users_search"
    hx-params="search"
    hx-trigger="input changed delay:500ms, keyup[key=='Enter'], load"
    hx-target="#search-results">

    <!--....other html....-->

    <tbody id="search-results">

    </tbody>
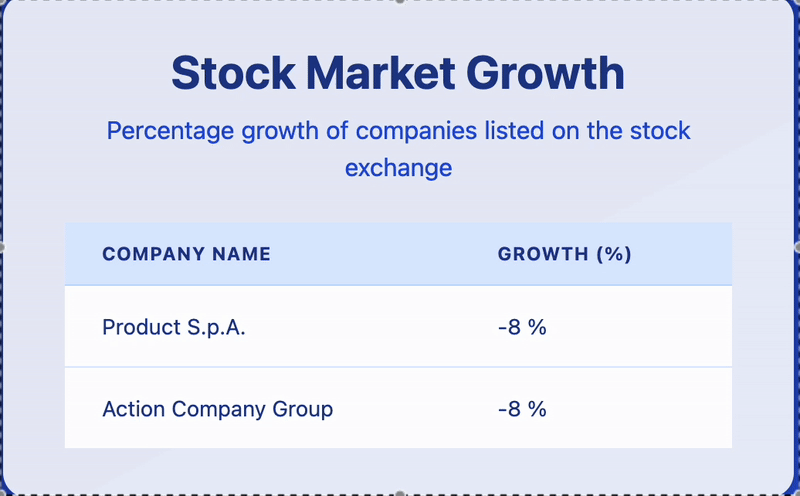
Polling
To implement a polling system we need to use hx-getto send multiple get request, hx-swap to update the html with the response and hx-trigger to get data when we load the page and every "x" seconds.
Controller
    #[Route('/polling/data', name: 'polling_data', methods: ['GET'])]
    public function pollingData(Request $request): Response
    {
    $companies = $this->companyService->getCompanyWithUpdate();

    //return update about growth for each company
    return $this->buildResponse($companies);
    }
Build response:
    private function buildResponse($companies): Response
    {
    $html = '';
    foreach ($companies as $company) {
        $html .=
        '<tr >
         <td class="px-6 py-4 whitespace-nowrap">
         <div class="text-sm text-blue-900">'.$company['name'].'</div>
         </td>
         <td class="px-6 py-4 whitespace-nowrap">
         <div class="text-sm text-blue-900">'.$company['growth'].'</div>
         </td>
         </tr>';
    }
    return new Response($html);
    }
polling_table.html:
    <!--...other html....-->
    <tbody class="bg-white divide-y divide-blue-100"
    hx-get="/polling/data"
    hx-trigger="load, every 3s"
    hx-swap="innerHTML">

    </tbody>
    <!--...other html....-->
Pagination
To implement pagination i'll show you a different approach using a template engine (Twig in this case).
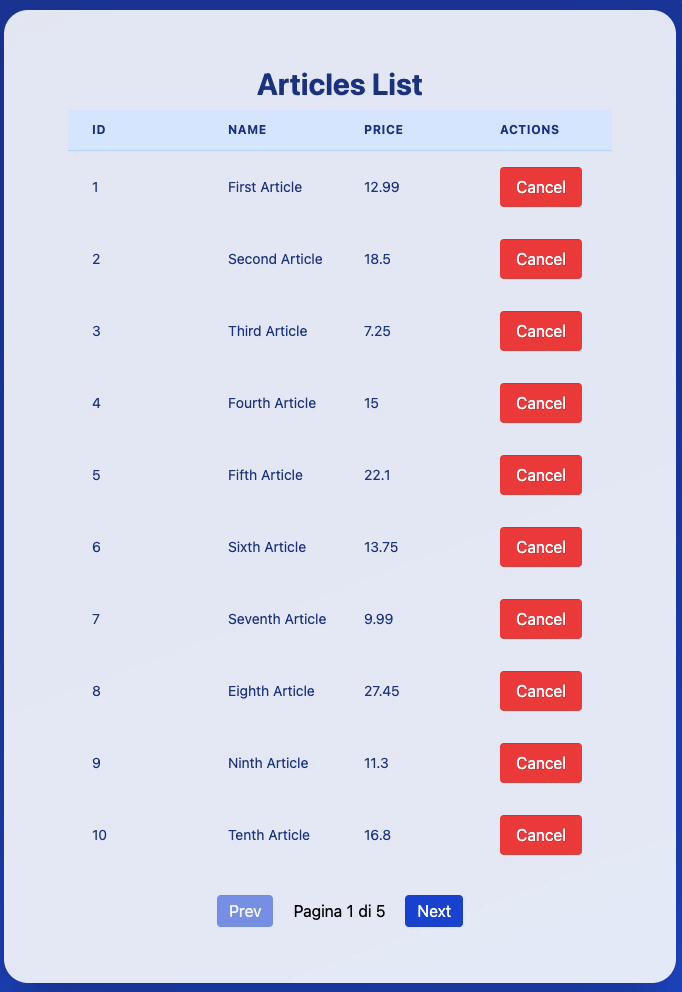
Other than delete we have used hx-get combined with hx-target and hx-swapto implement next and prev button.
In these example we have used hx-delete to send the delete request with the hx-confirm,hx-swapand hx-target inside the tbody element.
Controller:
    #[Route('/articles/page', name: 'app_articles_page', methods: ['GET'])]
    public function page(Request $request): Response
    {
    $articlesPage = $this->articlesService->getPage(
    (int)$request->query->get('page', 1),
    (int)$request->query->get('pageSize', 1),
    );

    return $this->render('articles/articles.html.twig', [
    'articles' => $articlesPage->items,
    'currentPage' => $articlesPage->currentPage,
    'totalPages' => $articlesPage->totalPages,
    'nextPage' => $articlesPage->nextPage,
    'previousPage' => $articlesPage->previousPage,
   ]);
    }
article's table
    <tbody hx-confirm="Are you sure?"
    hx-target="closest tr"
       hx-swap="outerHTML swap:1s">
    {% for article in articles %}
    <tr>
    <td class="px-6 py-4 whitespace-nowrap">
    <div class="text-sm text-blue-900">{{ article.id }}</div>
    </td>
    <td class="px-6 py-4 whitespace-nowrap">
    <div class="text-sm text-blue-900">{{ article.title }}</div>
    </td>
    <td class="px-6 py-4 whitespace-nowrap">
    <div class="text-sm text-blue-900">{{ article.price }}</div>
    </td>
    <td class="px-6 py-4 whitespace-nowrap">
    <button class="bg-red-500 hover:bg-red-700 text-white py-2 px-4     rounded"
    hx-delete="/articles/{{ article.id }}">
      Cancel
    </button>
    </td>
    </tr>
    {% endfor %}
    </tbody>
article's button:
    <div class="flex justify-center mt-6 space-x-2">
    <button class="px-3 py-1 bg-blue-700 text-white rounded hover:bg-blue-800 disabled:opacity-50"
    hx-get="/articles/page?page={{ previousPage }}"
    hx-target="#articles-table-and-pagination"
    hx-swap="outerHTML"
    {% if previousPage is null %}disabled{% endif %}>Prev</button>
    <span class="px-3 py-1">
    Pagina {{ currentPage }} di {{ totalPages }}
    </span>

    <button class="px-3 py-1 bg-blue-700 text-white rounded hover:bg-blue-800 disabled:opacity-50"
        hx-get="/articles/page?page={{ nextPage }}"
        hx-target="#articles-table-and-pagination"
        hx-swap="outerHTML"
    {% if nextPage is null %}disabled{% endif %}>Next</button>
    </div>
Conclusion
Implementing features like active searching—and many others—becomes remarkably simple with HTMX, requiring you to write almost exclusively HTML. This simplicity reduces development complexity while maintaining powerful functionality for dynamic, interactive web pages.
HTMX is an excellent choice for projects where advanced graphical functionality isn’t a priority, such as administration panels, dashboards, or other content-focused applications. By eliminating the need for extensive JavaScript frameworks, HTMX helps cut development costs and speeds up the delivery process, all while keeping your codebase easier to maintain.
Moreover, HTMX bridges the gap for backend-oriented developers, empowering them to create dynamic frontend features without requiring deep knowledge of modern JavaScript tooling. Its lightweight, dependency-free nature makes it not only cost-effective but also accessible to a wider range of programmers.
Whether you're building practical dashboards, simplifying server-client interactions, or just striving for cleaner code, HTMX provides the flexibility and efficiency to meet your goals. Combined with its compatibility across various template engines and backend languages, HTMX becomes a versatile and indispensable tool for modern web development.
If you'd like to dive deeper into practical examples, you can find the repository here.